Wednesday, March 31, 2010

Love Languages


This week I am working on some projects for our elementary school's annual Art Gala. My son's teacher asked me to make a piece of artwork to represent their class for the Art Fair, and another piece for the silent auction. She gave me free reign to do whatever I'd like. I chose to create my take on subway art. This one will represent their class and I've titled it....."Love Languages".


I bought a full sheet of half inch plywood and had it cut into (4) 24 x 36 inch pieces. You could also opt to buy the precut pieces of plywood. They come in 2ft x 4ft lengths. I used flat black spray paint on two and a satin brush on paint for the other two. I definitely like the flat better for this project.


This was my first time using my Cricut with the SCAL software on my computer. I first downloaded 9 different basic fonts from Dafont. This site is awesome.....they have hundreds of free downloadable fonts to choose from. Then I typed out my words in all these lovely languages, pushed a button, and just like that my cricut and my computer worked together to make magic with vinyl! I have been nervous to try SCAL, thinking for some reason it would be hard. It was sooooooooo not hard! It was amazing and I cannot wait to use it for many other projects.


I am so stinkin excited with how this turned out......I really L.O.V.E. it!
Tomorrow I will show you the piece I am making for the silent auction. It is very similar. In fact, I think the two of them together would make the most fabulous grouping on the wall. Very Pottery Barn-ish.

Monday, March 29, 2010

Are Your Walls Naked?


Ok, ladies...let's hear it. Do you struggle with what to hang on your walls. Do you have fully clothed walls or are they nekkid (that's how we say it down here)? I get alot of questions and comments from people who are afraid to adorn their walls. WHY? Well, in my little 'ol opinion, it's fear.....the "Debbie Downer" of all perfectionists. She whispers in our ear making us doubt our strengths and abilities, thus keeping us from creating something beautiful. DO NOT listen to that voice anymore! Listen to yourself. Be true to yourself. Find your own personal style. Then you can move past that fear and make your home reflect YOU!


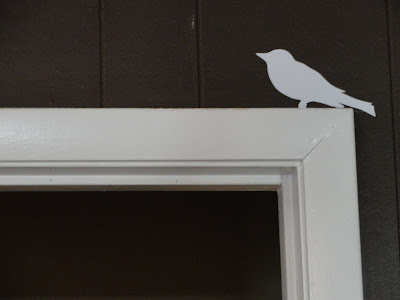
These cute little birdies have been on my to do list for some time, and I finally stole a few minutes this weekend to get them done. Such a simple addition, but so stinkin cute! I love this one perched on the corner of the door frame.


And seriously...isn't this aqua blue bird adorable? LOVE him! He makes the whole wall much more interesting, don't you think?


I better be careful, or soon my gallery wall of empty frames might just take over the whole room! My collection of yard sale, thrift store, and trash frames is on-going. I simply cannot help myself when I see a good deal on a nice big chunky frame. It doesn't matter if the color is hideous, because I spray paint them all heirloom white to tie the whole grouping together. I don't even notice color when I'm shopping for second hand frames. As long as it has good bones, it's a keeper and it ends up coming home with me. Never again will I pay regular store prices for frames. I have been spoiled rotten from shopping second hand.


I really enjoy this wall of empty frames. It is random and silly and quirky, but it is so me. And I love finding new additions to funk it up even more! But, if you're not into the empty frame look, another great idea would be to use vinyl decals inside some of the frames....an initial, a monogram, a bird, crown, chandelier, etc.....anything that speaks to you and reflects your personality or personal style. Then to unify the look, simply spray paint all the frames the same color. This is a great wall filler for anyone struggling with what to hang on their empty walls. I know there are some of you out there with scantily clad walls. Please, don't let your walls be naked...it's so sad. Walls deserve love too. Don't let your fear of too many holes or not enough money keep you from having something pretty to look at. Alot can be achieved with little to no money, and a bit of paint and creativity. So, what are you waiting for? Grab those ugly hunter green and mauve frames from 1987, give 'em a coat of your favorite paint color and go to town, baby!


Thursday, March 25, 2010

Silhouette Plates

I love silhouettes....everything about them. I think their simple beauty is timeless and I would love to have professional ones done of my children one day. I have seen lots of different tutorials on making simple silhouettes. And as simple as they are...have I ever sat down and actually done it? Nope, I've been dragging my feet on that one. Why? Wellllllllllllll, it all goes back to my perfectionist roots I think. Here's my theory. In my desire to make some beautiful silhouettes of my own, I've let my fear of messing them up keep me from it. Isn't that just silly? Wouldn't it be better to actually try, with the possibility that they just might turn out great.... instead of not trying at all and having nothing to show for it? So, I'm taking baby steps. I made this silhouette plate from an image I found on google. I simply printed it out, traced it onto black vinyl, cut it out, and transferred it onto a 25 cent yard sale plate. Easy...no chance of failure...confidence builder!

I love this plate, but I'm already thinking of changing it up a bit. The other day I found a hand drawn silhouette of my mom from probably 30 years ago. I would LOVE to make a copy of it and replace this random lady's profile with that of my sweet southern belle mom. Now, that would be a treasure!

For this one I used my Cricut (the home decor cartridge) to cut out a chandelier silhouette.

I'm working on a plate wall for my bedroom. I've been trying to pick up black and white plates as I find them. Love me some Ross and TJ Maxx...they always have the best plates for super cheap. I was thinking I would get one more plate. But I really want that random, effortless, didn't even try to make it look asymmetrical look.


This picture from Pottery Barn is my inspiration. See what I mean about random and effortless??? Ummmmm, yeah...it is not as easy as it looks. I thought I could do something similar without being a big ol' copycat and doing exactly the same arrangement as PB. Well, that didn't work out so well. Guess who just sketched out this plate arrangement on a piece of paper and stuck it in her purse? That would be me!


What is my problem? Even when I try to be random...I cannot help myself. Can involuntary usage of symmetry be a compulsion? I think I might need professional help.


Wednesday, March 24, 2010

Easy Project With Bunnies on a Stick


(originally posted April 9, 2009)


Ok, ok...yes, I know these cute bunnies on a stick are so yesterday's news. I have seen them on everyone's blogs and LOVE them, but never got around to getting some of my own. My sister, Jen, just happened to be at Pier One today when I called. I told her about the flying bunnies and that she just HAD to get one. Not only did she get one, but she also got a couple for me. Too sweet. Have I told ya'll how much I LOVE my 3 sisters? No...well, let me tell you again. They are my best friends and I would be lost without them! Anyhoo, as I was pondering what exactly to do with these little cuties, I had an idea. See all those supplies in the picture above? That's what I started with. I already had everything sitting around waiting to be fabulatized. (yes, I just made a new word...deal) So, I started by stuffing crumpled up magazine pages into the bottom of these yard sale urn thingies. Then I popped in some floral foam, wedged it in real tight with more crumpled pages, stuck the bunnies in, covered the top with moss and...VOILA!

Easy Peasy.


No, the bright green reindeer moss just isn't working for me. Too many greens that clash...not good. Something else is missing. What could it be? Oh yeah, it needs a ribbon. Well, duh, of course it does. Everything looks better with a little bow tied around it. Ya'll know I have a problem...it's not a secret that I am a ribbon addict.

Yes...this is sooooo much better.

Bunnies, and toile, and moss...oH mY!


Remember this bowl I got for 50 cents at a yard sale? It is perfect for holding my fuzzy green pine cones that I paid WAY too much for, but had to have them, and now almost regret buying them, but not really. The dirt cheap bowl and the pricey pine cones just balance each other out, right? I think this might be my favorite spring decoration yet. So simple.

My friend Jamie is having a fun giveaway on her blog for an absolutely adorable fabric applique set. Not only is this a fun giveaway, it also supports a wonderful cause. Be sure and check it out here @ Our Journey.


Tuesday, March 23, 2010

The Art of Layering

Today I want to touch on the fine art of layering in your home decor. This is something I struggle with because I tend to go with the "less is more theory" most of the time. I don't like lots of doodads or tchockees (is that a real word?). They can easily overwhelm your space and give a cluttered appearance. I have an version to clutter, thus the reason for the less is more theory. But, I have noticed lately the importance of layering things in your decor. The Nester is an expert at layering. I'm pretty sure she has her master's degree in layering home decor. It seems to come naturally to her, and I love the eclectic looks she comes up with. So, in an effort to help myself, I decided to do a hands on post on the subject.


Here we have the ultra extreme simple look...............boring!


But with the addition of a colorful runner, some tassells, and decorative plates.....the look is transformed and seems more finished, more polished. The beautiful colors in the runner compliment and accentuate the gorgeous red pears. The different textures of the tassells and the runner add interest. And the plates bring in another splash of color and pattern.


Here's another one for you.....my mantel. I knew I wanted this large piece of art and the urns with feathers. I really like the scale of these items together, but it needs more. If you wanted to go minimalist, this would work. I personally think it needs more balance and a bit of personality.


Watch the scale of the items you put together. You don't want to put lots of little things in front of one large item, like I did here. This does not work! It needs balance.


Yes, the scale of this large platter with the even larger piece of art is much better. I really like having personal touches in all of my decor. And honestly, this is nice, but could use that personal touch. Let's see how adding some framed pictures and a couple of decorative accessories will look..........


Ok....that's it. I think I've manged to put together a nice mantel, with some beautiful accessories, color, texture, and personality without being too cluttered or too simple. Mission accomplished. Now if I could only channel the Nester in all of my decorating I would have it made. Everything she touches looks simply beautiful and effortless. Can I be her when I grow up?????


Sunday, March 21, 2010

My Salvation Army Treasures and a Winner!


We have a WINNER!!!!

Drumroll, please..................................

Lucky commenter #159, The Hershey Bryces.

CONGRATS and happy glossing!


Like my cute new spring jacket? Guess where I found this adorable little thing? I'm sure my title didn't give you any clues, right? Ha! I scored this treasure at The Salvation Army for $2.99. I hear people going on and on about their local Sally Ann or Goodwill and I feel slightly jealous. Our local store is super icky and way overpriced. NOT a good combination. So, while on vacation this week, I about made my hubby wreck when I shreiked STOP.THE.CAR. Not only did he stop the car, he actually dropped me off by myself and took the kids to the toy store. Reason # 687 why I love my husband! He totally gets me.....sometimes.

Have I mentioned my love affair with frames? One can never have too many frames, in my humble opinion. Especially when you can find nice sturdy solid oak ones with ridiculously large molding for a dollar or two. These will be painted and hung on my wall of empty frames. Another thing I love...empty frames. Weird, I know.


I pretty much peed my pants when I saw this lamp. I have been waiting and waiting and waiting for Target to clearance these out...with no such luck. I just can't bring myself to spend $30 or more on a lamp that I technically do not need, but desperately want. But, for $6.99 with the plastic still on the lampshade.....wrap it up, I'll take it! I saw lots of crap, but also lots of great stuff too. They had this giant upholstered chair with a cane back for $39 that I briefly considered, but I would have had to leave a child in Georgia, and that just didn't pan out. But for under seventeen dollars I got a trendy little jacket, 4 great frames, and a brand new acrylic lamp. Not too shabby, huh?


We had a wonderful time being together as a family this week. Despite the fact that all 6 of us battled a wicked nasty stomach virus, we still had a good time. I guess that says alot about our desire to be together, no matter what. My 4 year old said it best when she saw her daddy that first night......"Dad, I missed you so much....but we're back together...we're a family again". Heartbreaker, right? That girl has a way with words. There's nothing much sweeter than a little girl and her daddy.....so precious!


Friday, March 19, 2010

SPRING BREAK GIVEAWAY!!!


So, I promised you a giveaway this week and I'm finally making good on that promise. In honor of Spring Break and the beautiful weather we have been blessed with this week, I decided to share one of my very favorite accessories for spring........lipgloss! Not just any lipgloss, though. And not just one lipgloss, but SIX tubes of fabulous lipgloss from Smashbox!!!! I am in absolute love with their lipgloss. It is my favorite by far. If you could see the bag full of various glosses I have in my purse right this minute, you might possibly be horrified. All 6 of these are in the bag, plus a few more. I love to wear each one alone and sometimes I mix several colors. How ever you wear them, you really can't go wrong. I treated myself to this set after Christmas, and I use at least one of them every single day. The colors in this picture are not all that accurate. They are much much prettier in person. The set includes 2 full size glosses and 4 half size glosses, valued at $96.


To be entered in to win this giveaway, leave a comment on this post before 10pm on Sunday March 21st.
Good Luck.....and happy commenting!

Thursday, March 18, 2010

20 Minute Spring Table Runner Project


Hi there! I'm so excited to be guest blogging at Imperfectly Beautiful. I have to say -- Amanda is one of my favorite, favorite people in the blogging world. She is so creative, so smart and so sweet!!! Thanks for letting me visit!


I'm Jen from tatertots & jello. And I have a quick little project to bring some Spring sunshine to your table.


{20 Minute Spring Table Runner Project}


I was at Target the other day when I saw these fun placemats. I fell in love with them because they kind of remind me of crocheted doilies. And I am having a little doily fascination lately. Plus, they had really great Spring colors. So I bought a few -- and oh ya, they were a really good price too - that doesn't hurt!


Materials:


Placemats -- you can use as many as you like depending on how long you want your runner to be. I used three.

Scraps of materials -- two coordinating prints

Buttons

Doilies/burlap or whatever you want to use under your rosettes

Ribbon -- one spool (9 feet)

Needle and thread


I brought them home and experimented and thought they might make a cute table runner. So the first thing I did was attach the placemats together -- overlapping. I used a simple needle and thread. I attached them at both sides of each placemat.


Then I made some simple flowers using coordinating fabric. I cut a 2 inch wide, by 2 foot strip of fabric from both fabrics. I folded each strip of fabric accordian-style.


Then I secured the end of the fabric by sewing through all the ends of the material with 4 stitches. Then I wrapped it around to meet at the other side so it looked like a flower. And then I stitched up that side. Under one of the flowers I attached a doily. And on the other flower I attached it to a circle of burlap.


On top of the flowers I attached some fabric scraps and then a sparkly button. Then I attached both flowers to the placemats.


The last thing I did was thread ribbon through the holes in the edges of the placemats. If you are using regular placemats with no holes, you can sew the ribbon or glue the ribbon around the edges of the placemats. I had a little bit of leftover ribbon so i tied a little around each of the rosettes so the ends stick out from under the flowers.


It's simple, fast and easy. I love the way it brightens up my kitchen!!!


I hope you are having a wonderful getaway with your family, Amanda!! Thanks so much for letting me come by! And stop by my blog sometime if you have time -- tatertots & jello.


Have an amazing day!

XOXO

Jen is one of my besties in the bloggy world! I am amazed daily by the awesome projects she comes up with. She is seriously one of THE most creative people I have ever met! So, thank you Jen, for sharing your fabulousness with us today. Your spring table is gorgeous. And I love that you made that runner out of placemats...what a great idea. I love ya girl! {{{smooch}}}

Wednesday, March 17, 2010

Hand Towel Makeover from Richella @ Imparting Grace

Hello, all you friends of Amanda's! I'm Richella from Imparting Grace, and I'm so happy to be guest posting for Amanda today. Amanda's been one of my favorite bloggers for a long time, so I was thrilled when she asked if I would write a post for Imperfectly Beautiful. Today I'd like to share with you a small, fun project that I just completed.

After months of agonizing over a new paint color for my powder room, I recently decided on Restoration Hardware's Silver Sage. I love the way the new color looks in this room, and I'm especially happy that I could re-use all my accessories. All, that is, except for the towels.

I am usually a plain-towel kind of girl, but for the powder room, I like to get a little fancy. Since this room is often used by our guests, I like the hand towels here to be beautiful as well as functional. So I watch for pretty hand towels on sale, and over the years I'd picked up several that worked great with the old color in the powder room. Unfortunately, most of them didn't work nearly so well with the new color.

This towel was pretty new, and was still in excellent condition. I was wishing I could make it work with the new room when it occurred to me that I could just give it a face-lift. I had some fabric left over from another project (don't we all have piles of fabric scraps?) that I knew would look great in my new powder room. So here's what I did:

  • I washed and dried my fabric scrap so that it would be pre-shrunk. My mama would be so proud that I remembered to do this.

  • I pinned the scrap face-down onto the front of my towel.

  • I turned the towel over to the back and, using the design of the towel as a guide, I stitched a seam. My sewing skills are very basic. Straight seams are about all I can do, but that's all I needed for this project. (If you don't even sew straight seams, I think you could complete this project with fabric glue.)

  • Once the fabric was stitched in place, I turned the towel over and pressed the fabric down.

  • I trimmed off the edges with pinking shears.

  • Then I folded under the sides and bottom of the fabric, using the sides and bottom of the towel as guides, and pinned it all in place. Since my sewing skills are so elementary, I subscribe to the "pin twice, stitch once" rule.

  • Once it was all securely pinned, I stitched it into place. Done!

Now I have a new embellished towel for my new powder room. And the best part is the price: free!

It's not perfect, but it's Imperfectly Beautiful, and that's good enough for me.

I'm so grateful to my precious friend Amanda for giving me this chance to connect with her readers. I hope you'll come visit me at Imparting Grace. I'll be so glad to see you there!

Thanks so much to my dear sweet friend Richella for guest posting for me today! This woman is such an angel and i am blessed to call her my friend. Be sure and stop by her blog and say hi. And of course, leave her lots and lots of nice comments here, as well. Hope y'all are having a wonderful week! I miss y'all so much and look forward to getting back with you soon.

Related Posts Widget for Blogs by LinkWithin