Tuesday, August 31, 2010

Bring Those Country Crafts into the 21st Century


We've all seen them, possibly had them in our homes {{{gasp}}}. Yes, I'm talking about primitive country crafts that were all the rage in the 80's and early 90's. You will find them abundantly at thrift stores, yard sales, and you might possibly have one or two in your attic or basement. I vividly remember the one that hung in our home growing up. In fact, I found one similar at a yard sale recently and decided to take the 50 cent risk and bring it home for a makeover.


I started by sanding the top down with my power sander. I wasn't taking any chances with those country hearts and houses showing through my paint job. I gave it a light coat of spray on primer, then brushed on 3 coats of aqua blue latex paint.


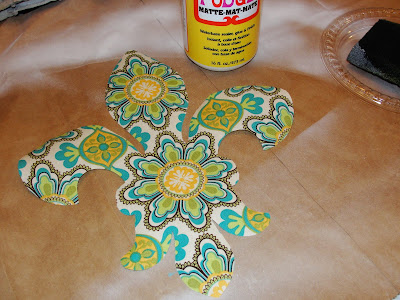
Now comes the fun part.....fabric and mod podge! I coated my fabric piece with mod podge, let it dry, then cut out the fleur de lis using a stencil I already had. Did you know that when you mod podge fabric, it allows you to cut the fabric without fraying? It's an awesome trick!


I used more mod podge to apply the fleur de lis to the board. When that dried, I brushed on two coats of mod podge ever the entire project.


I am in LOVE with this fabric! Remember last week when I told you about the fabric I'd ordered from Hawthorne Threads? Well, it got to my house two days later and let me tell you.....it is beyond gorgeous. I can't wait to get started on the pillows for my couch!


I decided to put the half moon plaque above my front door. I absolutely love the way the aqua blue pops off the brown wall. And the bold floral fabric really adds some personality. {Sorry for the glare off my black door....the sun was wicked bright this morning!}


Today over at The CSI Project we're kicking off our weekly challenge, "Mod Podge". Already there are over 80 creative projects linked up....shoes, jewelry, furniture, art, and more! Our guest judge is Amy from Mod Podge Rocks and there is a fantastic prize package of Plaid products up for grabs! We'd love to have you stop by and check it out. And if you have a mod podge project you'd like to submit, even better!


Monday, August 30, 2010

The Many Lives of a $1 Yard Sale Frame


After my mini laundry room makeover, I realized I needed some kind of message/bulletin board to keep things semi organized. With 4 busy kids I have endless amounts of school papers, appointment reminders, schedules, and artwork that pass through my hands each day. I had this wonderful frame that was sitting unused and I knew it would be perfect with a little tweaking here and there. This trusty one dollar yard sale frame has proved it's worth ten times over. It's had 5 paint jobs, lived in several different rooms, and served each purpose well. I think I definitely got my dollar's worth, don't you think? Let's take a look back on the evolution of this versatile frame!


This is the original frame straight from a yard sale. Lovely, isn't it?


I decided to make a chalkboard out of it, for the first in a series of makeovers. The frame got painted white and distressed and the picture part I flipped over and painted with chalkboard paint. Easy and fun, but in true Amanda fashion, I quickly tired of it and wanted a change.


This time I painted it parakeet green.....and hated it. So I took some turquoise paint and layered it on top.......still hated it. I ended up brushing my favorite color craft paint, Delta Ceramcoat Seafoam, over both layers and LOVED it! I covered the backerboard with a scrap of canvas dropcloth and made a hairbow holder for my girls.


That ended up being a disaster. My two busy little girls could not keep their hands off it and those bows ended up ALL over my house, every.single.day. So.........I tried it as a picture frame/bulletin board. Same thing happened - they wanted to pull those pictures off and carry them around. That didn't work for me either.


So, the frame got put away in a closet and left for dead. But, not for long. A new idea was born and the old frame got revamped once again. This time it became a bulletin board for my new/old laundry room. I used three cork tiles, cut them to fit, and hot glued them in. Not bad for about 10 minutes of work!


I don't know if you can tell from this picture, but my favorite thing about this frame is that you can see all five layers of paint showing through. It is weathered and worn, old and a bit ragged, but perfect for my needs. I LOVE it!


There is zero natural light in my tiny laundry room, so I apologize for the poor picture quality. This is it hung on the back of my laundry room/pantry door. I like that I can see it when I first walk in from the garage, but it is hidden from guests when they come in the front door. With all the papers that cycle through our house on a daily basis, I'm sure this board will come in handy and prove it's worth once again. And I can't wait to see what it's next life will be!


Saturday, August 28, 2010

Expressions Vinyl Giveaway WINNER!


Thanks to everyone for entering the Expressions Vinyl Giveaway! What a great response. I loved reading all of your comments and was happy to hear that there are many people out there who love this company as much as I do! We do have a winner of the gift certificate, but really everyone's a winner today. Expressions Vinyl is offering all of my readers a 10% discount on all orders placed August 28 - September 7.

Just use the coupon code: BEAUTIFUL

And don't forget that orders over $100 always qualify for free shipping!


Now, on to the winner....sorry for the suspense! Comment #140, Arlene, is the lucky winner of the $30 gift certificate from Expressions Vinyl.

"I have been wanting to try vinyl with my cricut...would love to try this! I have some baby presents to make and was thinking some personalized onesies would be great!"

Congrat on your big win, Arlene! Now go shopping for some FREE vinyl!!! Have fun making all those personalized onesies and don't forget to show us some of those adorable presents when you finish creating them, okay?


Be sure and visit Expressions Vinyl for all of your vinyl needs and take advantage of that great 10% off coupon they're offering!


Friday, August 27, 2010

Laundry Room Mini Makeover


You know how right before a party or get together at your home, you're scrambling to clean and make everything look just so? Well, if you're a crazy person like me, you're also finding absolutely unneccessary things to do as well! Like give your tiny inconsequential laundry room a mini makeover minutes before your guests arrive. Yeah, that would be me! First I cleared off all the crap that was covering every single surface of my dryer, so I could start with a nice clean slate. Already I could breathe easier. Then I asked myself....."Self, why didn't you do this ages ago?"


My goal was to use things I already had on hand.....nothing new. I remembered this mirror I'd found at Ross months ago for less than $7. It wasn't exactly the right color, but I knew I could fix that. Unfortunately it's been sitting in the closet, until now, waiting to be given a makeover.The glossy white paint really transformed it.....I love it!


I stuck it on top of my $3 yard sale cabinet. Then I added a giant vinyl monogram to the front.


Here's another item that's been sitting un-used in the closet. I bought this giant glass jar at Walmart ages ago and never really used it. Now I know it's the perfect size to hold my extra large box of laundry detergent. The little white melamine cup was from my Grandma's kitchen and I think of her everytime I do laundry now. I put dryer sheets in the other glass jar and covered some old books with scrapbook paper for a bit of pattern. The acrylic lamp I found at Goodwill. Yet again another thing I love that has sat useless. I'm so glad I decided to makeover my laundry room on the fly so that I could give all of these things I love a good home with a purpose!


The cabinets above the washer and dryer get to hold some of my thrift store/yard sale treasures. And I hung some pocket files on the wall to hold incoming and outgoing paperwork. For zero dollars I'm pretty happy with the way this tiny room turned out. I actually smile when I go in there to do laundry now. It is such a change from how it was before.....cluttered and chaotic. Now it feels calm and serene. My neice came over the other night and the first thing she said when she saw it was........."Now THIS is the only way laundry should be done!" She is so right, I have to agree with her on this one. Thanks Hannah......that made my day.

Wednesday, August 25, 2010

360 Degree Living Room Tour

Welcome to my humble abode, friends! I'm so glad you're here. Come on in and take a peek.
{Isn't it fun to anonymously snoop around other people's homes in the comfort of your pj's?}

I've had lots of requests to show this room as a whole, so I finally decided to take the plunge and give you a tour!In the past, I have featured snapshots of our living room here and there, but never have I shown the whole room together. It is defnitely a work in progress and I think that is probably why I've kept this space on the down low. It still needs work, but I love the changes so far.

When you first walk in the front door, my mantel is to the immediate left. My dad crafted this custom made mantel for me when we first bought our house almost 4 years ago. The original one was dark and ugly and I absolutely hated it. So, I showed my dad a picture of what I wanted and in days he had it whipped up and installed for me!


Next, we have our computer/cricut workspace and tv zone. The black armoire I fell in deep love with a few years back and I just HAD to have it. It is a big bold piece and I still love it. Unfortunately, the beauty of the aged black finish is lost against the chocolate walls. Note to self.....these are important things to consider when buying big ticket items. I am now seriously considering painting it white, but dreading what a big project that will be!

The couches are nice, but a bit too traditional for me. I would adore white slipcovers, but the hubby nixed that one real quick! The alternate plan is to spice this area up with some funky throw pillows and fun area rug. Anyone want to buy a 5 x 7 brown shag rug???


My wall of yard sale/thirft store frames is one of my favorite things in this room and definitely the most commented on by visitors. Again, I am dying to lighten things up by painting my piano, but the hubs has some reservations! Have you seen some of the gorgeous photos floating around out there of painted pianos........they are to.die.for.


Next we have the entrance to the hallway and bedrooms and the first opening into the kitchen. This is a very large, open room with tons of space. It presents a bit of a design challenge, but we opted to create different "zones" throughout the room which makes it nice. It breaks up the space, making it feel more cozy while still using the space efficiently. We basically live in this room. Most of our daily activities happen right here. And.....it's great for parties, which is always a nice bonus!


The back half of the room opens into the kitchen. I hated that dividing wall when we first moved in, but it proved to be the perfect space for a makeshift mudroom. As soon as the kids come in from school, they can throw their shoes in the basket by the front door and hang their backpacks up in a flash. And although I wish it looked this clean all the time, the reality is a bit different.


This is the cold hard truth of it all. But, you know what? I am totally ok with this. It is functional and very well used. And, just for the record.....yes, we have winter coats and scarves hanging here in the middle of 100 degree August. I'm just keepin it real, people!


Remember when I said I was making throw pillows for the boring brown couches? These are just a few of the fabrics I ordered to make them with. Aren't they gorgeous and so fun? My newest obsession is Hawthorne Threads. They have the most beautiful selection of fabrics and great prices. I've been window shopping there for a while, but finally took the plunge and ordered 5 yards of sumptuous, funky, fresh fabric! I can hardly wait to get it in the mail. I was suprprised when I got an e-mail the morning after I ordered, that the package had already been shipped out. And priority mail, at that! Now, to convince my hubby (the one with the mad sewing skills) to sew me up some giant pillows!


If any of you missed my giveaway going on right now, be sure and click over HERE to enter. One lucky winner will be chosen this weekend to win a $30 gift certificate from Expressions Vinyl. At only $2 a yard.....that's a whole lot of vinyl! Thanks so much to my newest sponsor, Expressions Vinyl, for offering such a fun giveaway!




Tuesday, August 24, 2010

Spray Painting Lamps


I love these genie lamps....the shape, the color, the style, they are nearly perfect. Except, for the fact that the deep rich oil rubbed bronze color does not work against my chocolate brown walls. I've lived with them like this for quite some time, because I just couldn't bring myself to paint over such a beautiful finish. Unfortunately, they blended right in with the wall color and basically disappeared. I could not let such a fantastic shaped lamp fade into the background. So, I pulled up my big girl panties and got to work. I started by covering the metal harp with a plastic bag and painters tape. I used Kryon Fusion in gloss white to paint the lamps. It is a great quality spray paint with excellent coverage.


The result is a fresh, clean, modern look and I LOVE it! The unique shape of the lamp really stands out now and the white just pops against the chocolate wall.


After I painted the base, the lampshade color just didn't look right. I knew I should recover them, but I just wasn't in the mood for all that. So, I came up with a simple solution that I think worked really well! I bought a yard of white cotton fabric and cut wide strips to tie around the lampshade. I love how it ties in the white lamp base and makes the champagne colored shade take a back seat. A simple, cheap, and easy solution for a lazy girl who doesn't want to recover odd shaped lampshades!


Just a reminder.....the Expressions Vinyl Giveaway is still open. Don't forget to enter to win a $30 gift certificate to their online store. If you missed it, click here to leave a comment on the giveaway post. The winner will be announced Saturday.


Related Posts Widget for Blogs by LinkWithin