Thursday, June 10, 2010

Zipper Flower Embellishments


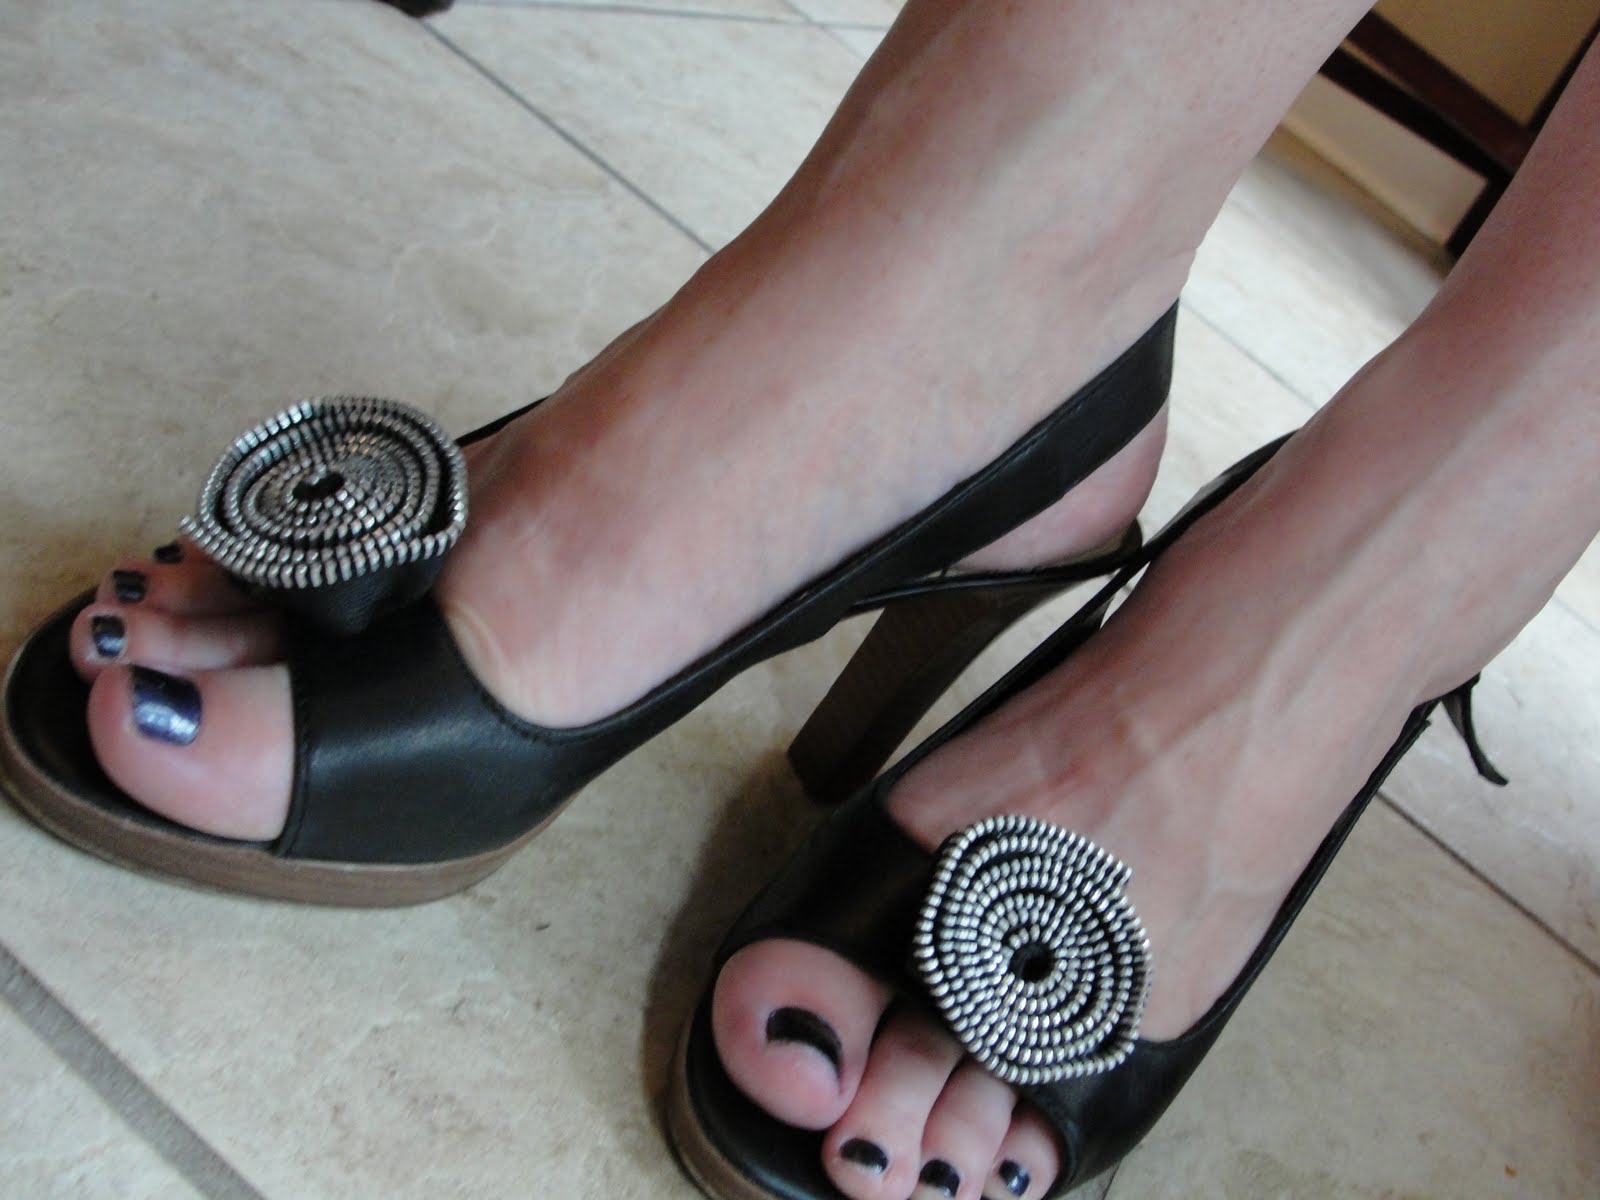
This is what you get when you ask your 11 year old son to take pictures for you! My zipper flowers turned into a smiley face. Actually, he did a fantastic job. And here's the funny part......when I asked him to take pics of my feet and hands, he didn't even bat an eye. He complied like it was the most normal thing in the world for his mom to ask him such a question! Now I know that I've successfully turned my whole family into blogging crazies.


Anyway.....back to the whole point of this post (sorry, I'm easily distracted)! I am totally enamored with zippers lately. They seem to be everywhere......on shoes, clothing, even jewelry. With that in mind, I decided to make my own zipper embellishments. I started with this bracelet. First I wrapped a dollar store bangle with ribbon. Then take your metal zipper and unzip it. Cut it right above the zipper pull, and that will split it into two zippers. Now just wrap it in a circle dabbing on hot glue as you go to hold it all in place. Cut a piece of felt to fit the back and glue that on. Then you can easily glue it to your bracelet.


I used a 24 inch zipper to make bigger flowers for my favorite pair of shoes. But instead of gluing them on, I used sticky velcro strips. That way I can take them on and off or even put them on different shoes when I want a change.


Are these too edgy to wear to church??? I am in LOVE with them.


I must admit, I am obsessing over these zipper flowers. Hmmmmm......what else can I put them on?


Tuesday, June 8, 2010

Martha Stewart Inspired

In honor of our Martha Stewart inpsired challenge over at The CSI Project this week, I thought I'd repost my copy cat version of Martha's infamous tissue paper pom poms. She gives a very detailed and quite perfect tutorial on her site. But this is my lazy girl version...complete with no tutorial at all...just pictures. If you'd like my play by play, full length tutorial you can click HERE.


For more Martha inspired craftiness and creativity, be sure and stop by The CSI Project. Our special guest judge this week is Martha's very own Crafts Department!!! There is still a day and a half to link up your crafty goodness, so get to it!


Visit thecsiproject.com

Monday, June 7, 2010

Renovate, Remodel, and Restore

This weekend I had the rare opportunity to get away by myself for a couple days and travel to my sister's house in Louisiana. They are in the midst of a remodel that has unfortunately gone on for more than a year because their contractor bailed on them with the job less than halfway finished and ALL the money spent. My sister had this to say.....

"We started this project May 5, 2009 with the anticipation of being done in September 2009. We now know that our former contractor has a history of purposely underbidding jobs. He bailed on us August 15th (prior to that we went for one month without anyone coming to the “site”). At this point we were on our own. Ah, the pay as you go plan. Living on sub floor in a literal construction zone. It is now June 2010. We hope to be done with the interior soon and will then build our deck and do landscaping.Though we had a tumultuous remodel ride and I thought about calling HGTV’s Holmes on Homes a couple of times, the lessons of patience, perseverance, and what is really important (not stuff!) were definitely humbling and great learning and growing experiences for us."

I seriously admire her attitude and resilience! I was honored to be able to go and help them with some finish work. I'm pretty sure we caulked and puttied at least 2897 nail holes on the trim throughout the house. We had a blast and laughed and talked the entire day. They have a lovely home in the historical district that is 113 years old. Their mission was to maintain the historical integrity of the house while also modernizing it. Today I want to share with you some before and afters and a few pretty details.

I am in LOVE with this fridge in their new pantry. It is classic vintage with a swanky coat of cherry red appliance paint! They left the original Bakelite handle as is.

This is the before shot of the front of the house after the siding had been ripped off. Notice they did not have a front door on the FRONT of the house....only a side and back door.


And here is the after. Isn't it lovely? Every single detail is swoon worthy.......the door is beyond beautiful, the light fixture, the mailbox, even the house numbers are ultra fab.


Simple elegance!
(my sister wanted me to stress that the house is still unfinished and many of the pics show that)


The master bath is a complete addition to the house. It is dreamy!


When we stayed over recently, my girls wanted to take baths in this tub all.day.long. Seriously,that's pretty much all they wanted to do.


I am lusting after this light fixture!


And the sconces to match. Can you believe she found those mirrors for $22 each clearanced at Target?


My absolute favorite part of this spa-like bathroom are the gorgeous granite countertops. Wouldn't this color granite be fantastic in a kitchen with a white subway tile backsplash?


This is the guest bath. Now imagine with me if you will, a dark cabin like bathroom with carpeted floors, dark wood plank walls, and a low ceiling. Unfortunately my sister lost many of her before pics when her hard drive crashed, so you'll have to use your imagination on this one. Needless to say, it is a complete and utter transformation!


This former dresser was repurposed as a vanity. They bought a scrap piece of granite and had it cut to fit. They tried really hard to repurpose as many items as they could. The rest they donated to good homes to serve as someone elses treasure! I got some gorgeous old windows and my other sister got a pink claw foot tub.


I love how they mix the old with the new and make it all work beautifully.


This is the before shot of their back porch.


And this is the after. AMAZING.....huh? This space became a new mudroom/hallway/entry.


This is the view when you walk in the back door. After finishing all those pesky nail holes, we even had a little time to do some staging and take some pretty pictures......my favorite part!


Cute little Pottery Barn splurge to hold keys and mail.


This chippy white bench was a $5 yard sale find and the wire baskets were another Target clearance score at just $6.24. What a perfect spot to sit and take off your muddy shoes and throw them in the basket!


Again, I love the mix of the old with the new. My sister has such a knack for this. I hope y'all enjoyed our little tour filled with inspiration. I had a fantastic time helping out. I love you both Beth and Ronnie. Thanks for a good time, some satisfying work, the best company, and some rocking eats! When can I come back and help again?


Thursday, June 3, 2010

Out With the Dark...In With with the Light


It all started with this gorgeous piece of linen I found on clearance at Hobby Lobby. We all know I am a sucker for anything aqua/seafoam related, and this beautiful damask print was no exception. It was marked down from $30 a yard to just $10 a yard. I could not pass that deal up...it was perfect timing. Remember those toast colored lampshades that blended right into the toast colored walls in my kitchen? Well.....this fabulous fabric was the perfect solution for my drab to fab lamp makeover.


I started by tracing one of the side panels of the lampshade onto the back of the fabric. I did this 8 times. Then I cut them all out and applied fray check to the edges to keep them from looking messy with stray threads. Once the fray check was dry, I used spray adhesive to apply the fabric panels I'd cut out to each side of the lamp. To cover the seam where each piece of fabric met, I hot glued a strip of bias tape down each side.


Here are my toast colored walls with my toast colored lampshades. And my $1 shutters.
BORING!


And here they are now......boring no more! The damask linen on the shades and a fresh coat of spray paint on the shutters have transformed this space from dark and boring to light, fresh, and airy. If you want to know more about the sunburst mirror off to the side, you can read about it here. It's made out of free paint sticks from the hardware store!


Add some glassware into the mix with a bit of shine from the silver tray....and it's good to go. I feel my mood brightening as we speak. All that dark mixed with too many neutrals was totally bringing me down. I shopped my house for everything on this sideboard. The only thing I purchased was 1 yard of $10 fabric. I feel like I have all new stuff now. THAT is why I love shopping the house!


Soft and pretty with the lamps on.


Light and bright and cheery with the lamps off!


One more thing.....I want opinions on this. Should I paint the shutters and sideboard a creamy distressed white or leave them like they are???


The Girl CreativeThe DIY Show OffMakingSumo's Sweet StuffBWS tips button
Show and Tell Green works for me wednesday at we are that family
CreativeShareWednesdays http://www.thethriftyhome.comAll Thingz Related Life as Lori


giveawaysHookingupwithHoH


Fireflies & Jellybeans - http://firefliesandjellybeans.blogspot.com/


The Shabby Chic Cottage - http://www.theshabbychiccottage.net/


House of Hepworths - http://www.houseofhepworths.com/

Related Posts Widget for Blogs by LinkWithin