Monday, May 31, 2010

Project Teaser....Can you Guess?


I have big plans for these humble little paint sticks. The theme for our challenge over at The CSI Project this week is "hardware store". At least one element of your project has to be from the hardware store. My super creative friend Jen made a wreath for her front door out of heating ductwork.....seriously. You really must check it our HERE. The way her brain works is simply amazing and I am in awe!


So......can you guess what I'm working on? Here's hoping it turns out as fabulous as I see it in my head. I may have to stay up all night to finish it, but I WILL get it done. I've had way too many unfinished projects going on around here and I just can't take it anymore. I desperately need to finish something....anything! Check back tomorrow for the big reveal.


Thursday, May 27, 2010

$1 Yard Sale Shutters and Some Kitchen Inspiration


Confession...I hate my kitchen. It is small and outdated and completely devoid of color. It needs some serious H.E.L.P. Unfortunately, at the present time that will consist of a slim to none budget. So, I've been thinking about what I could do to add some color and personality without demo, remodeling, or cash. Yes, I realize my options are minimal. But still...options there are! I am so in love with that picture at the top...see it up there, all lovely and fun and full of color and personality??? I've been hanging on to this one for inspiration for a while. I am dying to paint my ugly laminate counters this gorgeous shade of aqua blue. I just mentioned it to hubby and he immediately started shaking his head NO. I even had pictures to show him to prove it COULD be done. My research and backup pics did no good. He was soooooooo not sold on my brilliant idea. Hmmmmmph! Back to the drawing board for me.


For now I will gaze at this...my dream kitchen. And I will hold out hope that Publisher's Clearing House will knock on my freshly painted, very chic, black front door with my millions in tow.


Ok...back to my random ramblings for the day. I scored these shutters at a yard sale last weekend for $1. They are scuffed and dinged up and a bit sad. BUT....they scream potential to me. I think they might be just what I need to spruce up this area of my kitchen for the time being. I'm thinking a lovely shade of......I bet you can't guess the glaringly obvious answer? Yeah right, we all know I'm talking about the color sent from heaven......my beloved aqua.


Here is the space in question. The shutters will be painted, the mirror will be switched out(another project in progress), and the lamps need some serious therapy. Any brilliant ideas or inspiration you have...send it my way. Oh and remember we're working without a budget here. I know..... I am so demanding!


Tuesday, May 25, 2010

The Paint Challenge is On!


Visit thecsiproject.com


Just a little reminder that today is the day to link up your paint projects over at


There are over 80 amazing entries so far and I can't wait to see more. The linky will be open until Thursday at noon, so you still have a little time to get those last minute projects done. You ladies are so unbelievably talented and creative....thanks for inspiring me today and every day!


Monday, May 24, 2010

$1 Monogrammed Teacher Gifts

EDITED TO ADD.......Well, this is just what I get for posting after midnight. I completely left out all the details of this project, like how I did it and what materials we used. Those seem to be important to y'all so here goes.....and I apologize for my loserness! I used vinyl to cut out the dots and lettering. The font I used is called French Script, which I cut out using my cricut and the Sure Cuts Alot software. And for those of you concerned with how these will hold up...the vinyl is very sturdy. If you hand wash these, which you should with aluminum bottles anyway, they will be fine. I've used vinyl on mailboxes, license plates, etc and they have held up great.


My sister Emily found these adorable metal water bottles at the Dollar Tree last week. She came over after church today and we used the Cricut to personalize each one for her kids teachers. Are they not THE cutest things ever??? I am so jealous that she bought all they had.....I want one for myself!


You could make some with your school colors, like this one.


Or sass it up real good with this fun hot pink bottle complete with fancy monogram and bright colored dots.


They sell water bottles almost identical to these at a local boutique for $20 each. We made these for $1 a piece. You really can't beat that for a super cute personalized gift!


And for all the coffee and hot chocolate lovers....monogram a mug. What teacher wouldn't love to carry around her very own personalized mug at school everyday? I am really digging these fast, fun, extremely affordable gift ideas. And if you're like me and have yet to start on your end of the year teacher gifts....this is the way to go. Thanks, Emmie for sharing this fantabulous idea with us!


Friday, May 21, 2010

Quatrefoil Wall Art


Lately I am obsessing over this beautiful pattern called, quatrefoil. I first saw it in the Ballard catalog and it was love at first sight. Now I see it all over the place. I guess it's the latest hot trend. I've had it on my list of things I wanted to try, but didn't know where to start. Well, my bestie, Jen from Tatertots and Jello, came to my rescue. Her post over at The CSI Project this week was THE most fabulous quatrefoil tutorial. She even included a free printable stencil!!! You can click HERE to get your very own copy...isn't she sweet?


This is my little creation using her awesome stencil. I am in L.O.V.E. I'm already dreaming up various ways to use this stencil again and again and again!


Here is how I did it. First I printed a copy of the pattern Jen made. Then I taped it to the back of a plastic stencil sheet. Because these sheets are clear, you can easily cut the shape out following the lines of the pattern.


Now you're ready to stencil your little heart out. This is definitely a process and it takes time and patience...so be sure you have a little of both saved up! It has been a long time since I stenciled anything, and in my mind I was thinking it would be quick and painless. Ummmm....not so quick and slightly painful. I kid...really, it wasn't. I just wasn't prepared to spend several hours laboring over the detail of every single paint line. Maybe if I'd had this warning, I wouldn't have started this project at 10pm. Regardless, I would do it again. In fact, I plan to do another quatrefoil stencil project very soon, but I might need to set aside a few days to do it!


FYI.....I used a paint dauber to stencil the pattern on the canvas. If you don't know what I'm talking about, there is a picture of it two shots up. It's that little yellow round sponge on the end of a paint brush. After I stipled the pattern on, I went over the edge of each shape very carefully with a small paintbrush to sharpen the lines and filled in the centers.


This wall art is just the pop of color I needed in this corner of my chocolate brown living room. I love everything about it....the pattern, the color, the free price tag, and the fact that I made it myself. I've always enjoyed decorating and crafting, ever since I was a little girl. But it has only been in the last few years that I have been able to truly enjoy and embrace my creativity. For so long I denied myself the satisfaction of creating beautiful things. I was so caught up in the notion that everything needed to be perfect, that I didn't allow myself to try new things. What a waste! Let me tell you....once I let go of those ridiculously high expectations of myself, it was absolutely liberating. I love the freedom I've allowed myself to create, to share, to be inspired...beautiful imperfections and all!!!

Visit thecsiproject.com

That is why I am so excited about this new project....The CSI Project! It is a culmination of everything I love about blogging. It is a place to share your creations and be inspired by the creativity of others. Our first weekly challenge link up starts Monday. The theme for the week is "paint". Our guest judge is none other than my good friend, Sarah from Thrifty Decor Chick. We will have lots of fun, some fabulous loot, and plenty of inspiration. So get those projects together and get ready to link up for the fun. I am super excited to see what y'all come up with.....and I hope to see you there!


Join us Saturdays at tatertotsandjello.com for the weekend wrap up party!

Thursday, May 20, 2010

Bathroom Transformation


If you'd like to see how I turned this nasty builder basic bathroom from this..........


.....to this, I'm over at The CSI Project today talking about how I did it. Come over and visit, if you have time. I'd love to see you there!


Visit thecsiproject.com

Tuesday, May 18, 2010

Lampshade Makeover...Girly Edition


After making the bow holder for the girls' room, I decided to tackle another project that I've been putting off. I guess I was a little nervous to take on recovering theses lampshades, but I am sooooooooooooooo glad I did. My best friend covered them for me the first time and they were perfect. I didn't want to mess them up. Well, let me tell you.....it would be pretty hard to mess these up. The straight cylindrical shape of these shades has got to be the easiest thing in the world to recover.....yah for me!


I am loving this new color palette...lots of white, soft pink, and the most luscious shade of aqua blue ever!!! (fyi...for those who asked, the color on the frame is an acrylic craft paint called Seafoam by Ceramcoat.) I would like to slather it all over every surface in my house...that's how much I love it!


This was the lampshade in it's former life....cute, huh? I really adored that fabric, but it was time for a change. Instead of bold hot pinks and lime greens, I'm going for an understated elegance with the white, pink, and seafoam blue/green.


Anyway.....I started by carefully ripping the existing piece of fabric off the lamp. I used it as a template to cut out my new lampshade covers. I found this beautiful white cotton pique in the clearance bin at Hobby Lobby for less than $3....perfect!


Next, I started at the back seam and began rolling it over the top edge, putting a line of hot glue as I went. When you get back around to the back side again, fold the rough edge of the fabric under and hot glue it in place. I then added a wide pink ribbon at the top and bottom and finished it off with aqua blue rick rac.....a.d.o.r.a.b.l.e.


See that chenille braided rug underneath the lamps? I scored that beauty at Hobby Lobby today for 66% off. I absolutely could not pass it up. The colors are the perfect match to the room. I really want to go back and get at lest one more....they has a whole stack of them. I considered waiting for it to get marked 80 or 90% off.....but that is way too risky when you've already fallen in love!


My little collection of girly frou frou accessories to finish off the room.


DIY Day @ ASPTL

Sunday, May 16, 2010

From Ugly Frame....to Cute Bow Holder


This weekend I worked on some projects and little details for my girlie's bedroom makeover. I remembered this frame I had painted just the right shade of aqua blue a couple months ago. I loved the color, but didn't know what to do with it, so I put it in the closet. And there it sat until I had a light bulb moment Friday night......to turn it into a hair bow holder. We have oodles of bows and unfortunately they are kept in a gallon size ziploc bag. Yeah...that is pretty pathetic. Now, they can be displayed on something pretty that will also compliment the new colors in the room.


This is what the frame looked like when I bought it for one dollar at a yard sale last year.....U.G.L.Y. I originally painted over the lovely picture with chalkboard paint, then painted and distressed the frame white. It was cute, but eventually I got tired of it and put it away. So, I guess this is it's third life!


I used a scrap of canvas drop cloth, wrapped it up like a present, and added some hot glue to hold it in place.


Then I added two pieces of pink ribbon down the front and hot glued it onto the back.


I popped it back into the frame and it was good to go.


Here it is adorned with all of our bows. Yes...we do have an abundance (this is just a few). After having two boys for so long, it was easy to go overboard when the girls came along!


All the colors and patterns started to make me a little crazy, so I had to take them off and try something else. I used those little swirly metal paper clips from my scrapbooking supplies to attach some pictures of the girls to the ribbon strips. Now I can either use it vertically as a bow holder or flip it this way and turn it into a fun little bulletin board. I love that it can serve dual purposes...way more bang for my buck that way!


DIY Day @ ASPTL

Friday, May 14, 2010

Polyvore LOVE!


Girly Room

Fashion Trends & Styles - Polyvore


Last night I got totally sucked into the world of Polyvore and didn't go to bed until almost 2:00am. I was having so much fun, I didn't even realize what time it was. Have y'all ever been to Polyvore? It is AMAZING! You can basically make little collages of everything you'd ever want in a room, and each item has a link on it to where you can buy it and the price. The possibilities are endless. You just type in what you're looking for and pages and pages of choices come up for you to scroll through. You can categorize it by color, price, type of item, etc. And it's not just home decor or interior design, there's art and fashion as well. It is a really cool site. I had so much coming up with an inspiration board for a dream room for my girls. This is what I would do if money were no object and I could go out today and buy anything I wanted. Now, that is fun to think about! I am obsessed with this lovely shabby chic color pallete right now....lots of white with touches of soft aqua and a whisper of pink...so pretty and soooooooooooo girl. One of my very favoite items I found are those drapes and unfortunately something is wrong with the picture. I wish you could see the full view of them. The top third is a gorgeous smocked material and it is heavenly. And such a bargain at only $195 a panel! Haaaaaaaa...I wish. And those aqua pillows....a mere $220 a piece. I cannot even imagine being able to go out and buy anything I wanted, no matter the price. I think even if I was rolling in money I'd still have a hard time spending money so lavishly....it's just not my style. But it IS fun to dream! What about y'all? If you had a money tree...would you be spendy or thrifty????


FYI...we are having a fun paint giveaway over at the CSI Project today. Be sure to stop by and check it!!!


Visit thecsiproject.com

Thursday, May 13, 2010

Easy Dollar Store Craft


I went to the dollar store the other day looking for semi-cute containers to organize 547 barbie outfits, 87 pair of barbie shoes, and 43 barbie dolls. But instead of finding those, I stumbled upon some cute unfinished wood cutouts that I thought had great potential for cuteness. I couldn't resist them. I plan to use these in the girls' room to accessorize the next big project I'm working on....(such a tease, right?)


This is what we started with. Notice the paint smudge on the bottom. Upon realizing I hadn't taken a before picture, I grabbed this one out of my 4 year old's paint covered hands and snapped it real quick before the full blown meltdown happened. She wanted to "help" me paint so bad.....I think she ended up doing a fantastic job!


After she went to bed, I got out the mod podge and paper scraps and went to town. I've missed my old friend mod podge....it's been a long time.


I think they turned out so cute and will be the perfect compliment to the new color scheme in the girly room! I am really dragging my feet on this room's redo. Why, you ask? Well, part of the transformation involves taking the crib out and putting my 2 and 4 year old in a queen size bed together. That scares me just a bit. I fear that they will never sleep again. So....any tips for keeping them in their bed and getting them to actually sleep!?!?!


{{{{{{{{{{{{{{{CRICKETS}}}}}}}}}}}}}}


Yup...that's what I thought.


Tuesday, May 11, 2010

Mother's Day Happies


It's come to my attention that many people have no idea what a "happy" is. Seriously...I thought everyone knew that the word happy could be an adjective and a noun! Maybe it's a southern thing. My mother is a lover of the happies. She will find any excuse to give one at anytime to anyone, for no reason whatsover. We have dubbed her the Queen of Happies and she wears this title well. She taught me the fine art of happies and that in giving them...they make you feel, well......happy!


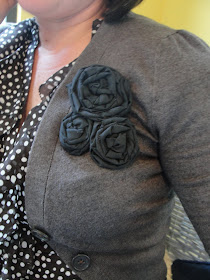
Since I am completely and utterly enamored with these rosettes, I thought I'd make some more to give my mom and sisters for Mother's Day. You know...Mother's Day happies. I sat down the other night and cranked out a bunch of new ones and once again, just couldn't stop. I think I might need an intervention. I carried them around my little 50 cent yard sale tray I spray painted balck and let everyone choose their favorite.


My niece chose this necklace, but I couldn't get her to model it for me. I love how this one turned out...I hope you love it too Becca!


The cluster pins were very popular. I got some special requests to make more in different colors.


I made some really tightly coiled and others loosely twisted and wrapped. I prefer the loosey goosey fluffy version, but some people really liked the tight coils better. It's fun to make lots of different varieties and see what happens. I love that there aren't really any hard and fast rules when it comes to these babies. You can just be totally creative and have fun with it!


My sweet mom got first pick and she chose this hot pink number. I love how it pops off the black.


I forgot to give one very useful tip in my tutorial last week. Whe applying the pin to the back...do not use hot glue. Use an epoxy of some sort, like E-6000. It will make that bond permanent and the pin will never pop off. Hot glue does a great job when wrapping your rosette. I just wouldn't recommend it for the pin. I think eventutally it would come off.


And don't forget, there is another giveaway going on today at Tatertots and Jello to celebrate the launch of our new site.......