Friday, April 9, 2010

Vinyl Lettering...Love It or Hate It???


I happen to really like it....in moderation. My sisters hate it. Well, maybe hate is too strong a word. But they defnitely don't love it. They give our mom such a hard time because she has it everywhere. She is ALL about the wall words. She asked me to come trick out her mailbox this week with a fancy nancy script of their last name.


I think it looks lovely!


While I was there, I thought I'd snap a few pictures of her favorite wall words. This one wraps around her entire kitchen and reads...."Thank thee for the world so sweet, thank thee for the food we eat, thank thee for the birds that sing, thanks dear God for everything, Amen". This was a sweet little prayer my mom used to say when she was little.


This one, "The Fondest Memories are made when gathered around the table", is above the doorway leading down into the sunroom. This is a large addition to the house where the dining table is and where all 29 of us gather to eat as a family once a month.


My mom fondly named it, "The Gathering Place"...and it is!


And just because I was feeling all sentimental I thought I'd snap a picture of the house where I grew up. Beautiful, peaceful, and abounding with love...inside and out!


So, what is your vote...wall words or no?
Do you love them or do you hate them?
Spill it.

Thursday, April 8, 2010

Parade of Mantels


The Nester is hosting a Mantel Party today and I just couldn't resist linking up. I am all about the decorating of the mantel. In fact, I probably change mine as much as I change my shoes! So, today I thought I'd show some of the many sides of my mantel decor.


I wish I cold take credit for this amazing vignette, but sadly I cannot. It was in my inspiration folder, under "obsession". LOVE all these different silhouettes...especially the one with the full length plaid dress!!! I think I could recreate this look with my printer and some fabric scraps.


Here are a few of my holiday mantels. The holidays are my favorite time of the year to dress my mantel. Halloween is a new one for me. I just got into decorating for it a couple years ago, and it quickly spiraled out of control. Spooky chic is what I like to call this style!


Last year's Thanksgiving mantel. Now that I look closer, I can see that my wreath needs some high heels...just a little boost, maybe a ribbon hanger.


Glitz and glam. Does it look like Christmas threw up on my mantel?


A new take on the glitz and glam Christmas.....a little less glitz and a bit more glam. Thanks Nester for the heads up on those adorable white feather trees from Dayspring!


This is definitely more of a minimalist look than I usually go for. It was a fun distraction for a day or two, while I photographed my word art. Speaking of which, I am a nervous wreck. Theses pieces are in a silent auction tonight to benefit the art program at my boys' school. Why am I so nervous???


Sometimes I like to change up my mantel completely. More often than not, all it takes is a small tweak here and there to get it just right. This set up was ok, but I didn't love it. But with some fluffing and puffing..........


......And a bit of indiscriminate tweaking, I think I got it just right. For now, anyway. I'm sure by next week, I will be itching for a new look, and it will be completely different. Issues, I tell ya...I have lots of them!


Wednesday, April 7, 2010

Online Shopping Disaster


It all started out innocently enough. I needed a new light fixture for my bathroom. And by needed, I mean REALLY needed, like we haven't had light in there for the past 8 months needed. So anyway....I finally found one that I could afford and also looked nice on Overstock.com.I have shopped overstock many many times and I'm always very pleased with my purchases. The reviews on this fixture were great, the picture looked nice, and the $47 price tag was the hook, line, and sinker! Comparative fixtures of this size and shape were $100 - $150 at Lowe's and Home Depot. I was rather pleased with myself for finding such a good deal. Well, I should have known something was up...you always get what you pay for, right? Here is what I found when I excitedly ripped open the box........


Speckled, splatter paint looking glass globes and........


.....speckled, splatter paint looking wrought iron. Oh heavenly days...I thought this look went away about 20 years ago. Apparently not. They still sell it and they are deeply discounted on Overstock!!! And yours truly got suckered by the cheap price.


I was super bummed that I was going to have to go spend another $25 or $30 to update the glass shades. But, yesterday my dad called me from our local discount salvage store (aptly named "Dirt Cheap"). He had found some sconces with the shades for $1.25. Yes, ONE DOLLAR and TWENTY FIVE CENTS a piece! The boxes are trashed and watered damaged, but all the parts are in there and nothing is broken. SCORE! The sconces are really cute with a brushed nickel finish, but sadly I don't have any use for them. They will go into the massive never ending garage sale pile.


Oh yes......I can breathe again. Those splatter painted ones were seriously giving me the heebies. These are nice and simple...just the way I like it.


And for now, I can live with the subtle splattered look on the iron part. When the light is on, you really can't see it...or so I like to tell myself. No really, it's not so bad. And if I get to the point where I just can't stand it anymore, I can always slap on a quick coat of spray paint, right?


And just to clear things up.....I will still shop with overstock again.. They have amazing deals, great merchandise, and fabulous customer service. Almost everything in my master bedroom makeover came from them....zebra rug, mattelesse coverlet, shams, sheets, pillows, bedskirt, etc. This one little mishap will not deter me from shopping with them again. I have no affiliation with this company by the way...I just didn't want to give them a bad name.
:)


Tuesday, April 6, 2010

Quick Birthday Gift Idea


I found myself in a pickle this morning. It is my best friend's birthday and we are meeting in 2 hours for lunch. I have no gift and barely enough time to shower, much less time to go to the store and find the perfect gift. So, what's a resourceful girl to do? Well, I pulled out a nice big frame I was saving for a rainy day such as this and went to town.


I cut a scrap of canvas dropcloth to fit the inside of the frame. I think it looks really nice. In fact, if you just glance at it, you could almost mistake it for linen...almost. Then I used my cricut and the sure cuts a lot software to cut out her last name and the established date in black vinyl. I love this font! I downloaded it for free from dafont.com...it's called Renaissance. Very girly and traditional and absolutely perfect for my friend!


I then appiled the vinyl lettering directly onto the glass of the frame. If she ever wants a different look, she only needs to switch out the piecce of fabric that's already there. I think this turned out so nice....I hope she loves it! I love it so much that I want to make one for my bedroom now. But I wonder.....how many monograms can one family have before it looks out of control??? Can you really have too many monograms? I'm obviously NOT the person to ask.....so, what do y'all think?


Sunday, April 4, 2010

A New Workspace and a Clean Slate


Can I just tell you how over the moon excited I am about this big beautiful table? Just the thought of having my very own 8 foot workspace makes me all giddy! And my family is pretty stoked that they will be able to eat at the dinner table again, too. My dad and I spent the better part of the day on Friday hauling out my old tiny desk, and replacing it with this newly refurbished table. I am fortunate enough to have a handy dandy, pack rat dad who has a big 'ol barn full of STUFF. I asked him a few weeks back if he had anything we could make a large work table out of. He told me to come plunder around his shop with him and we'd see what we could find. As soon as I saw this nasty stinky dirty 8 foot table top.....it was love at first sight. The length was absolutely perfect, but it was a bit too deep. We cut it down about 12 inches to fit the space, he built new legs for it, and POOF...I have a perfectly imperfect, new to me work table.


Unfortunately, there is one tiny little problem. The only place to put this fabulous table is in the master bedroom...right across from the bed. See, I actually took this picture while laying in bed. My feet are there and everything. Anyway, this limits me in my design of the workspace. I don't want to go to bed every night looking at a bunch of exposed crafts.....ah, the horror! So, I am asking my lovely, devoted, loyal readers and friends to share with me their thoughts and opinions on the subject. What are you ideas for hidden storage that is functional, pretty, and economical? I know that's a lot to ask...but humor me, okay? I have lots of ideas and inspiration pictures, but I'd love to hear your thoughts too. The only thing that is set in stone for this space is a skirt to go around the entire table. I have to use the storage space underneath for my inventory and such.


I am in love with this space. Each and every detail makes me swoon. The ladder makes my heart go pitter pat. And that giant memo board...to die for. If I had to choose one element from this picture to put in my space, it would be that corkboard with the nailhead trim. And I can so make that, but I worry that it would end up looking cluttered if I actually used it. Or beautiful and useless if I left it alone. Either way...not so sure about this?


This is more of the design I am leaning towards.....a skirted table for storage, long shelves above the entire length of the table, and lots and lots of hidden storage that's not ugly.


Keep in mind I have all of THIS to hide........


.....and all of this from my previous desk. I have quite the task ahead of me. It will take some time, a bit of work, and creativity...but I am definitely up for the challenge!


For now, I am basking in the joy of this lovely clean slate.


Thursday, April 1, 2010

More Word Art


I am super excited about this project I am doing with my son's class tomorrow. It's a slightly different take on the piece I showed you yesterday. Again, I used the "Sure Cuts Alot" software with my cricut to cut out each child's name in a different font and color of vinyl. I am going to let them do the rest, and hope they come up with a fabulous word collage, which I'm sure they will! Can I just tell you again how much I love this new software partnered with my cricut. I can sit down and cut out virtually any font at the touch of a button. It is seriously rocking my world right now! For an initial investment of about $70, I will now be able to cut out any font, wingding, dingbat, etc without having to buy an $80 cartridge every time I want a new font! How awesome is that???


Tonight I finished my "Hello" piece, to compliment the "Love" one. I think they look so cool paired together. They would be amazing hung on the wall, one on top of the other. I hope they are well received at the auction, and make the art program some much needed cash!


I apologize for the poor quality of these pics. I have been burning the midnight oil lately and have had to succumb to night time photography...not good! Leave it to me to have 83,000 unfinished projects going at the same time. Have I mentioned before that I might have a slight problem? Yeah....that's how I roll. But I'm thinking that maybe I should put myself on a schedule, instead of just winging it all the time and leaving chaos in my wake. Did I mention that I also hate schedules? I'm pretty much doomed.


Wednesday, March 31, 2010

Love Languages


This week I am working on some projects for our elementary school's annual Art Gala. My son's teacher asked me to make a piece of artwork to represent their class for the Art Fair, and another piece for the silent auction. She gave me free reign to do whatever I'd like. I chose to create my take on subway art. This one will represent their class and I've titled it....."Love Languages".


I bought a full sheet of half inch plywood and had it cut into (4) 24 x 36 inch pieces. You could also opt to buy the precut pieces of plywood. They come in 2ft x 4ft lengths. I used flat black spray paint on two and a satin brush on paint for the other two. I definitely like the flat better for this project.


This was my first time using my Cricut with the SCAL software on my computer. I first downloaded 9 different basic fonts from Dafont. This site is awesome.....they have hundreds of free downloadable fonts to choose from. Then I typed out my words in all these lovely languages, pushed a button, and just like that my cricut and my computer worked together to make magic with vinyl! I have been nervous to try SCAL, thinking for some reason it would be hard. It was sooooooooo not hard! It was amazing and I cannot wait to use it for many other projects.


I am so stinkin excited with how this turned out......I really L.O.V.E. it!
Tomorrow I will show you the piece I am making for the silent auction. It is very similar. In fact, I think the two of them together would make the most fabulous grouping on the wall. Very Pottery Barn-ish.

Monday, March 29, 2010

Are Your Walls Naked?


Ok, ladies...let's hear it. Do you struggle with what to hang on your walls. Do you have fully clothed walls or are they nekkid (that's how we say it down here)? I get alot of questions and comments from people who are afraid to adorn their walls. WHY? Well, in my little 'ol opinion, it's fear.....the "Debbie Downer" of all perfectionists. She whispers in our ear making us doubt our strengths and abilities, thus keeping us from creating something beautiful. DO NOT listen to that voice anymore! Listen to yourself. Be true to yourself. Find your own personal style. Then you can move past that fear and make your home reflect YOU!


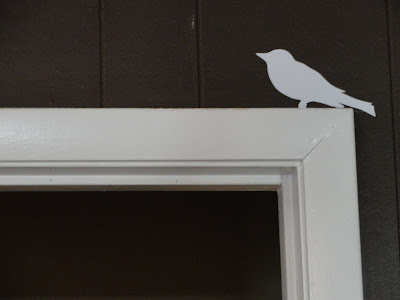
These cute little birdies have been on my to do list for some time, and I finally stole a few minutes this weekend to get them done. Such a simple addition, but so stinkin cute! I love this one perched on the corner of the door frame.


And seriously...isn't this aqua blue bird adorable? LOVE him! He makes the whole wall much more interesting, don't you think?


I better be careful, or soon my gallery wall of empty frames might just take over the whole room! My collection of yard sale, thrift store, and trash frames is on-going. I simply cannot help myself when I see a good deal on a nice big chunky frame. It doesn't matter if the color is hideous, because I spray paint them all heirloom white to tie the whole grouping together. I don't even notice color when I'm shopping for second hand frames. As long as it has good bones, it's a keeper and it ends up coming home with me. Never again will I pay regular store prices for frames. I have been spoiled rotten from shopping second hand.


I really enjoy this wall of empty frames. It is random and silly and quirky, but it is so me. And I love finding new additions to funk it up even more! But, if you're not into the empty frame look, another great idea would be to use vinyl decals inside some of the frames....an initial, a monogram, a bird, crown, chandelier, etc.....anything that speaks to you and reflects your personality or personal style. Then to unify the look, simply spray paint all the frames the same color. This is a great wall filler for anyone struggling with what to hang on their empty walls. I know there are some of you out there with scantily clad walls. Please, don't let your walls be naked...it's so sad. Walls deserve love too. Don't let your fear of too many holes or not enough money keep you from having something pretty to look at. Alot can be achieved with little to no money, and a bit of paint and creativity. So, what are you waiting for? Grab those ugly hunter green and mauve frames from 1987, give 'em a coat of your favorite paint color and go to town, baby!


Thursday, March 25, 2010

Silhouette Plates

I love silhouettes....everything about them. I think their simple beauty is timeless and I would love to have professional ones done of my children one day. I have seen lots of different tutorials on making simple silhouettes. And as simple as they are...have I ever sat down and actually done it? Nope, I've been dragging my feet on that one. Why? Wellllllllllllll, it all goes back to my perfectionist roots I think. Here's my theory. In my desire to make some beautiful silhouettes of my own, I've let my fear of messing them up keep me from it. Isn't that just silly? Wouldn't it be better to actually try, with the possibility that they just might turn out great.... instead of not trying at all and having nothing to show for it? So, I'm taking baby steps. I made this silhouette plate from an image I found on google. I simply printed it out, traced it onto black vinyl, cut it out, and transferred it onto a 25 cent yard sale plate. Easy...no chance of failure...confidence builder!

I love this plate, but I'm already thinking of changing it up a bit. The other day I found a hand drawn silhouette of my mom from probably 30 years ago. I would LOVE to make a copy of it and replace this random lady's profile with that of my sweet southern belle mom. Now, that would be a treasure!

For this one I used my Cricut (the home decor cartridge) to cut out a chandelier silhouette.

I'm working on a plate wall for my bedroom. I've been trying to pick up black and white plates as I find them. Love me some Ross and TJ Maxx...they always have the best plates for super cheap. I was thinking I would get one more plate. But I really want that random, effortless, didn't even try to make it look asymmetrical look.


This picture from Pottery Barn is my inspiration. See what I mean about random and effortless??? Ummmmm, yeah...it is not as easy as it looks. I thought I could do something similar without being a big ol' copycat and doing exactly the same arrangement as PB. Well, that didn't work out so well. Guess who just sketched out this plate arrangement on a piece of paper and stuck it in her purse? That would be me!


What is my problem? Even when I try to be random...I cannot help myself. Can involuntary usage of symmetry be a compulsion? I think I might need professional help.


Wednesday, March 24, 2010

Easy Project With Bunnies on a Stick


(originally posted April 9, 2009)


Ok, ok...yes, I know these cute bunnies on a stick are so yesterday's news. I have seen them on everyone's blogs and LOVE them, but never got around to getting some of my own. My sister, Jen, just happened to be at Pier One today when I called. I told her about the flying bunnies and that she just HAD to get one. Not only did she get one, but she also got a couple for me. Too sweet. Have I told ya'll how much I LOVE my 3 sisters? No...well, let me tell you again. They are my best friends and I would be lost without them! Anyhoo, as I was pondering what exactly to do with these little cuties, I had an idea. See all those supplies in the picture above? That's what I started with. I already had everything sitting around waiting to be fabulatized. (yes, I just made a new word...deal) So, I started by stuffing crumpled up magazine pages into the bottom of these yard sale urn thingies. Then I popped in some floral foam, wedged it in real tight with more crumpled pages, stuck the bunnies in, covered the top with moss and...VOILA!

Easy Peasy.


No, the bright green reindeer moss just isn't working for me. Too many greens that clash...not good. Something else is missing. What could it be? Oh yeah, it needs a ribbon. Well, duh, of course it does. Everything looks better with a little bow tied around it. Ya'll know I have a problem...it's not a secret that I am a ribbon addict.

Yes...this is sooooo much better.

Bunnies, and toile, and moss...oH mY!


Remember this bowl I got for 50 cents at a yard sale? It is perfect for holding my fuzzy green pine cones that I paid WAY too much for, but had to have them, and now almost regret buying them, but not really. The dirt cheap bowl and the pricey pine cones just balance each other out, right? I think this might be my favorite spring decoration yet. So simple.

My friend Jamie is having a fun giveaway on her blog for an absolutely adorable fabric applique set. Not only is this a fun giveaway, it also supports a wonderful cause. Be sure and check it out here @ Our Journey.


Related Posts Widget for Blogs by LinkWithin