Thursday, September 23, 2010

Make Your Own Oilcloth Fabric


It all started with gorgeous piece of fabric from Hawthorne Threads. It is from the Modern Meadow collection by Joel Dewberry, and I am in L.O.V.E with it! I ordered 2 yards and I don't think that's enough because I want to plaster it all over the place. Anyway, back to the subject....I'm easily distracted by pretty things. I've always loved the look and feel of oilcloth fabric, but it is hard to find and the selection is small. Sooooooo, I wondered if I could laminate my own fabric. I went on a search to my local crafts store looking for a product that might do just that.


I found something I thought would work, but then I needed something to put the laminated fabric on.....enter Old Navy. I found these great little accordian folders marked 47 cents and because all of their clearance is half off, they ended up costing me less than 24 cents. Hello, that is not even a quarter! How could I pass them up?


I used this iron on vinyl material by Heat n' Bond to laminate the fabric and it worked like a dream. I must admit, I was a bit skeptical.....but it really worked!


I cut a piece of fabric big enough to wrap around the front and back of my accordian folder. Then I cut a piece of vinyl the same size and ironed it on to the fabric, following the package directions.


See how it looks glossy now? That's my new, made by me, oilcloth fabric ready to dress up my little coupon holder.


I decided to use mod podge to adhere the fabric to the folder and it worked really well. I added a scrapbook embellishment with a piece of ribbon running through it to the bottom and hot glued them on. Now I can keep this little cutie in my purse and not worry about it kicking around in there getting dirty. The vinyl laminate will protect the fabric and I can wipe it clean whenever I need to. This would also make a great alternative for diaper bags, baby bibs, tablecloths, placemats, etc. Did I mention you can also use a sewing machine on this stuff??? It is amazing.....and the creative possibilities are endless!


Thursday, September 16, 2010

Gettin' Crafty With Empty Cans


Question :
What do you do with your empty food storage cans?


Answer :
Ummmmm, I save them for a rainy day......of course!


I knew I was hanging onto them for a good reason. I just didn't know what that reason was, until this week. I was clamoring around for a last minute birthday gift, with very little time and even less money...not a good combination for a winning gift! Luckily, I work best under pressure and came up with, what I think, is a pretty cute idea.


I found some adorable scrapbook papers in my stash that I've been hanging on to for years. I cut them to fit the can, mod podged them on, added a cute tag with vinyl letter stickers (all cut with my cricut), and voila.....a custom birthday bucket is born!


When you're finished decorating the buckets, you can stuff them full of all kinds of goodies. Army men, glow swords or crowns, silly putty, dvds, candy......the possibilities are endless! The best part.....you can totally customize them to fit the personality of the birthday child {and your budget as well}!
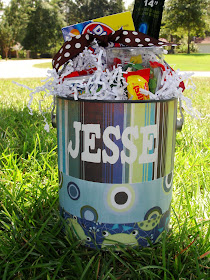


For this cute boy bucket, I ended up using a paint can you can buy at the craft store to decorate yourself. I had an old one I'd never used lying around, so I thought I'd put it to good use now! Better late than never, right?


This one was a bit more fun to put together, honestly. Boys are usually more adventurous and really dig things like flarp (noise putty, for those of you without young boys) and stretchy, gooey frogs and lizards!


I had so much fun making these birthday buckets, they might very well become my new gift staple! The price was right {free}, they were quick and easy, and they look so darn cute! How could you resist that? So, go dig those empty #10 cans out of the garbage and give them new life!


Wednesday, September 15, 2010

Just Can't Wait Till October


I tried...really I did. Last week I got my fall stuff out and decorated my mantel. It was beautiful and it drove me crazy. You see, I equate fall with halloween and I absolutely love decorating for halloween. I tried to be patient and just do the fall thing, but I couldn't do it...I'm weak. Those whimsical pumpkin topiaries were calling my name from the attic. Who says you can't put up your halloween decor in September?


If you missed this post from last year, click here to read how we made them. Note my lovely assistant's arms!


This is my front entry from last year when my door was red. Hated that color, but it did make my black feather wreath pop. Unfortunately, now you can't see it at all.


I put the fluer de lis canvas behind the wreath thinking it would make it stand out more, but that didn't work. Maybe a white feather wreath is in my future.


I love this wreath! Up close, you can see it just fine. The black feathers are irridescent and depending on the light, they have hints of purple and green. I really want it to stand out more, so I guess I'll use it somewhere else. I think a trip to Hobby Lobby and a little wreath crafting is in order now.....fingers crossed that feather boas are on sale this week!
Stop by The CSI Project to see more "Fall" inspiration. There are over 160 links so far! Lots of pretty pictures to inspire you and give you some great ideas for fall!

Sunday, September 12, 2010

Giveaway Winner


CONGRATS to Charish, the winner of a beautiful one of a kind illustration from my friend Meredith @ Mimi Galore!!!! Charish said.....


"I adore the "It's Getting Hot In Here, Blow Dryer Hair Illustration" (Blue). It would look so perfect in my bathroom... love love love this shop!"


And don't forget, Mimi Galore is offering a 15% discount on all of the "pink" illustrations in her etsy shop in support of the Making Strides for Breast Cancer Walk until September 16th. Get a head start on your Christmas gifts and give a truly unique gift to someone special. This is a fabulous cause and an awesome deal....so don't delay, check her out! Thanks Meredith for sponsoring this giveaway and for sharing your awesome talent with us!!!

Friday, September 10, 2010

Falling into Fall!


Even though the temperatures around here are still in the 90's, I am chomping at the bit to start decorating for fall! I love the colors, the tastes, the smells, and the feel of autumn in the air. So, I decided to get a jump start on the season and pull out some of my fall decor! Last year I put this wreath together with things I already had and picked up a few things here and there at Hobby Lobby. Instead of using it on my front door, I thought it would look nice on the brick above my mantel. I feel like I can enjoy it more here, rather than outside.


I got these lovely topiary forms at a yard sale for 25 cents last year and never got around to re-making them. They were covered in this awful orangey moss and an abundance of fakey fake orange and yellow leaves. Ummmmmmm, no thank you! After, I stripped them down to bare bones, I hot glued a feather boa around each tree form. A cheap and easy makeover.


I don't know how I feel about them, though. They're looking a bit like I wrapped kitty fur around them. My 10 year old actually laughed out loud when he saw them! Uhhh, thanks?


As you can see, I did a whole lot of moving and shuffling and tweaking in the process of putting my fall mantel together. I think I like this way the best......for the next 20 minutes anyway! Things are constantly moving and changing around this house. It's a sickness I have. Hi, my name is Amanda and I'm a tweaker!


Visit thecsiproject.com


Tuesday, September 7, 2010

Quatrefoil Garbage Can


Has anyone, besides me and my cheap self, noticed how outrageous the prices of bathroom garbage cans are??? I absolutely refuse to pay 20-40 dollars for a tiny little can for my bathroom when the giant trash can in my kitchen didn't even cost that.....seriously! So, what's a thrifty gal to do? Well, she waits for a good deal to sneak up on her. About a month ago I stumbled upon this white ceramic beauty at Target for $3.74, perfection! I was thrilled to have found this classic white can with a beautiful shape and nice weight.


Nice, but I think we can do better.


Enter my ever trusty Cricut, some grey vinyl, and the Sure Cuts a Lot software. I got a free svg file of this beautiful quatrefoil pattern from my sweet friend, Jenn at Tatertots and Jello. I imported it into my SCAL program and off I went to cut my vinyl. So easy and soooooo cute.....I LOVE it! Have I mentioned that I am completely and utterly addicted to cutting vinyl with my cricut? You can do sooooooooooo much with it. The possibilities are endless.


Click here for the link to the svg file, and here is the quatrefoil stencil that you can print out and use, if you don't have a cricut and scal software. Quatrefoil is an absolutely gorgeous pattern.....very graphic and oh so chic! I've stenciled it onto an artist's canvas, scrapbook paper, canvas dropcloth fabric, and now cut quatrefoil vinyl!!!! I can hardly stand how cute it is! If I had a money tree, I would love to do a whole wall with this pattern in vinyl. Yes, I could stencil it.....but let's be honest, I am way too lazy and way too impatient for all that! Having my Cricut cut the pattern out of vinyl is so much easier! Now, if you'll excuse me, I'm off to look for a money tree.


Monday, September 6, 2010

Art Giveaway from Mimi Galore

I am so excited to introduce you to my newest sponsor......Mimi Galore! This cute etsy shop is full of super chic illustrations that are so on trend right now. Meredith, is the owner and artist behind this fantastic shop. Her one of a kind illustrations are a mixture of pen and ink, prisma color pencil, watercolor, and a pinch of je ne sais quoi! For today's giveaway, she is offering one of my readers a print of their choice from her shop. Here are just a few of my favorites.......


From now until the 16th of September Mimi Galore is offering a 15% discount on all of the "pink" illustrations in her etsy shop in support of the Making Strides for Breast Cancer Walk. In addition, 20% of her proceeds will go toward this great cause. If you'd like more information on this, you can visit Team Mimi's support page. Here is what Meredith had to say about this cause that is near and dear to her heart.........

"I have and always will have great respect and admiration for the women out there that are fighting and have fought a great battle against breast cancer. This is a disease that has touched me personally with my mother. I want to dedicate these illustrations to those women. I look up to you and hope that you stay strong for yourselves, your families, children, and friends. I’m hoping that through the proceeds from my pink illustrations, I’ll be able to walk the breast cancer walk with my mother for the first time, in efforts to raise awareness!"


For a chance to win a beautiful one of a kind illustration of your choice from Mimi Galore's Fabulous Store, simply leave a comment on this post telling us your favorite piece in her shop. The giveaway will be open until Friday.....good luck!!!


Friday, September 3, 2010

Fabric Covered Notebooks

I've found yet another use for that beautiul fabric I bought from Hawthorne Threads. You know....the fabric I originally got to make pillows for my couch??? Yeah well, that hasn't happened yet because I keep thinking of crafty things to do with it. Basically anything that does not involve sewing a stitch! One of these days I will buckle down and actually tackle that project, but for now I'm enjoying getting crafty with my fun new fabric.

I showed how to make these over at my other blog, The CSI Project. Our theme for next week's challenge is "Back to School" and I shared these fabric covered notebooks as one of my favorite teacher gifts to start the year off right (brown-noser). In the past I've made these with scrapbook or wrapping paper, but I decided to try my hand at using fabric this time around. Let's take a look at how I made these, shall we?

Supplies
1. composition notebook
2. half yard of fabric
3. Heat n' Bond
4. Iron
5. Scissors
6. Pencil


I started by cutting the fabric big enough to cover the front and back side of my notebook.


Now flip your fabric over and iron on a matching sized piece of heat n' bond. Once the two are adhered to each other, you will trace the front and back covers of the notebook onto the backside (paper side) of your fabric piece. The heat n' bond will allow you cut the fabric without any fraying. Next, peel off the protective backing and you're ready to go.


Once you have your two fabric pieces cut out for the front and back, you simply lay them onto the composition book exactly where you want them and iron away! Now trim any excess edges and you're done. Easy, easy, easy, and cute, cute, cute!


I chose a coordinating fabric, cut a long strip, frayed the edges, and tied it around the front cover of my notebook as an embellsihment. You could even do an iron on applique with your teacher's intial to personalize it. I just love these little notebooks......making them, giving them, and keeping them! I love to pair the large notebook with a smaller version for the purse and a set of personalized notecards. They really make a beautiful gift set for just about anyone on your list!