Thursday, April 29, 2010

Christmas in.......April???

Is it weird that I am thinking of Christmas in April? Does it make me a total freak that I am already making holiday crafts? Well, if the answer is yes...then I'm just going to own my crazy ways and embrace it. Because that's how I roll and I'm good like that.


Y'all are probably soooooo tired of seeing all these frames I've been making lately. But I'm having fun with their versatility and finding new ways to spruce them up. You can find frames of all shapes, sizes, and colors at your local craft store or even a yard sale. Then you can use fabric, scrapbook paper, or even wrapping paper under the glass to give it a little extra pizazz. It can be completely customized to match your color scheme or you could keep it nice and neutral so that it could work in almost any room. For this particular one, I used a black frame I found at Walmart. I usually don't buy my frames there, but I loved the shape of this one. I like that it's an odd shape and size. And it works beautifully with this sweet nativity scene. Again, I found this font online at Lettering Delights. I downloaded and installed it on my computer. Then I used my Sure Cuts A Lot software hooked up to my Cricut to cut the images in vinyl. I applied them right on top of the glass, but you could also cut your image in reverse and apply the vinyl to the underneath side of the glass. If you missed my post on cricut tips and tricks....you can read it here.


If you're not the crafty type, you can just let me do all the work for you. I will be making these to put in my etsy shop for Christmas, along with some on boards, glass blocks, and ornaments. They make beautiful, meaningful gifts for the holiday season. But if you just can't wait and need to have one right this minute, I will be happy to comply. These beautiful 18 x 9 frames also look lovely with a family name and established date....like the one I made here, only smaller.


BIG EXCITING HUGE NEWS!!!!
On Monday May 10th, I will be celebrating the announcement of something awesome that has been in the works for the last 6 months. I am so unbelievably excited to share this fun adventure with you...I can hardly wait.This will be something that everyone can get excited about and have lots of fun with! So mark your calendars for Monday May 10th.....you will NOT want to miss it!


Monday, April 26, 2010

Can I Get a Do-Over, Please?


Remember when I posted about my fabulous new-to-me repurposed 8 foot work table? Well, I promptly went to town putting a skirt on it so that I could hide all of my "stuff" underneath. And guess what? I HATE it! Here are all the things I hate. Number 1....the fabric. I used painter's dropcloth because it was inexpensive and I thought the neutral color would be good. Ummmmm...not so much. I can't stand the wheat color in this room. In my chocolate brown living room it looks fab, but in here it's a snooze-fest. Number 2....my decision to NOT cover the legs. I was thinking it would make the whole process of getting stuff out from underneath easier. Guess what? It really doesn't make one ounce of difference in how I get stuff out. What was I thinking? Number 3......the addition of the ribbon to cover the hideous veneer trim. Not a complete bad idea. It does need to be covered, just not with ribbon. I think this might be the first time ever that ribbon has failed me. I'm so disappointed.


I guess it's not horrible, but it is just not working for me.


The ugly veneer is completely off on both side pieces, and I actually think it looks better like this than with the ribbon. Since then I have completely ripped off all of the ribbon and the rest of the trim. Now I have to pull 987 staples out of the table, so I can start all over.
Fun times.


Oh, how I wish I could leave it open like this. But unfortunately I have way too much inventory and crafty crap that I need to hide. Dang those hobbies of mine! I am hoping to get started on the new table skirt tomorrow. I found some lovely fabric at Hobby Lobby that I think will be the perfect compliment to my black and white room redo. Stay tuned for reveal #2........


Sunday, April 25, 2010

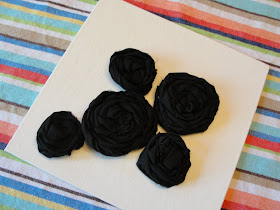
Shabby Chic Rosettes - No Sew

I have had these adorable rosettes on my to do list for a really long time. And I have been putting them off for just that long because I do not sew. And by that, I mean...I really can't sew, not even a straight line. When I need something hemmed or a button sewn on, I take it to my hubby. Yes, my big strong army man husband sews. He actually has three sewing machines and impresses me with his skills all the time! Funny, huh? Anyway, I've been thinking about how I could make these without having to sew or thread a needle. Enter my dear friend....the hot glue gun. These were super simple to make and completely addicting. I started making them late last night and made myself stop around 1:30 this morning. Seriously, they are so fun and easy! Before I show you how I made the rosettes, let me show you how absolutely adorable they are on my plain jane white lamp........


Complete transformation!


I started off by cutting my $1.99 a yard cotton fabric into strips. I didn't measure, I just cut and ripped to my heart's content. Now fire up that glue gun and let's get started!


Tie a knot onto the end of your fabric strip, tuck that small end under and secure with a dot of glue. Now start twisting the long end of your strip.


As you twist, start wrapping the strip around itself. Every so often, you'll want to apply a line of hot glue to hold it in place as you continue to twist and wrap. You can twist the fabric tight in some places and loose in others. This will give it a nice look that doesn't look like you just wrapped a bunch of fabric into a tight ball. Play with it and do whatever you think looks best. The first few I did look different from the last few, because I realized I liked them loosely twisted better. Tip.......as you are applying the hot glue, try to put it as close to the back side as possible. You don't want your glue peeking through the front where it can be seen. I learned that really quickly.


When you get to the end of your fabric strip, take that last little bit and glue it under to the back side.


If you'll notice, this is a low temp glue gun which means I only burnt off 2 or 3 layers of my skin while obsessively making these rosettes. No big deal, right? They were totally worth it.


For the smallest size rosette I cut one of my fabric strips in half. The middle size is one full strip, and the largest rosette is actually two strips tied together.


I pretty much want to plaster every surface of my home with these little cuties now.
I love the shabby frayed edges, but think they also look very chic and sophisticated. Now I'm off to figure out how to make them into a necklace. How adorable would that be??? I'll keep you posted on my progress!


DIY Day @ ASPTL


Thursday, April 22, 2010

A Little Nip and Tuck on the Plate Wall

I hope you know this was inevitable. I am a tweaker.... a nip and tucker of the home decor. I just can't help myself...I'm never satisfied. After finding this amazingly adorable font last week, I simply cannot get enough of it. You can find it at Lettering Delights. It is called "In Good Company". Love, love, love it. Couches, chairs, setteees, lamps, dressers, frames...all sorts of yummy goodness!


I never got around to putting anything on this platter, and now I know why. It was just waiting for this little vinyl settee silhouette. It fits the scale of the small platter perfectly.


A nice wingback chair silhouette fills out this 25 cent yard sale plate just right!


I don't know what kind of chair this is, but it's so simple and elegant...I had to have it on my plate wall.


Now I feel like this wall is truly complete and, dare I say it? Just about near perfect. I love the elegance of these silhouettes and how they seem to tie the whole grouping togther. Before it was cute, but it was pretty much just a mish mash of things...a chandelier, a face silhouette...it didn't flow. Now I feel like this wall has the cohesion that it lacked. I thought I loved it before, but now I am head over heels in love with it! If I could only stop obsessing over projects that were already completed and work on the rest of the room....I might be able to actually finish it before I die. Hmmmmmm..............


Wednesday, April 21, 2010

Rug Help


People, I desperately need your help. My wool rug will not stop shedding and I am about to go insane. I love my zebra rug, but if I have to see one more black fuzz ball rolling down the hallway like tumbleweed.....I might hurt someone. Before I bought this rug, I read all the reviews and the tips on how to care for your wool rug. They all said the rug should stop shedding after 15 - 20 vacuumings. I have vacuumed this rug no less than 150 times. And the shedding continues. I am becoming a crazy person. My once beautiful pristine zebra rug, now looks perpetually dirty because of all the black fuzzies. See that picture up there? Yeah...it doesn't look like that anymore and that makes me sad. So, all of you wool rug owners...please impart some wisdom on me. Help a girl out, before I have to commit myself to the looney bin over a hairy rug!!!

Jewelry Giveaway Winner


And the winner of Kristen's Custom Creations jewelry giveaway is............


comment #44......Jess said,
"I love the double stack mommy or grandma necklace and the love you more. That is what I tell my kids and hubby all the time!"


Congrats to Jess. What a great prize to win right before Mother's Day! I hope you enjoy your beautiful new custom creation. And thank you to Kristen for offering such a generous giveaway, as well.


Monday, April 19, 2010

Spring Signs


Well, I've been at it again with my cricut and the Sure Cuts A Lot software. I found the absolute cutest fonts last week and had fun playing around with different ways to use them. I made some new signs for my shop and a couple custom orders. This first picture shows the darling font I am absolutely in love with right now. It is called "In Good Company" and you can find it at Scrapnfonts{dot}com. It features a variety of chairs, couches, settees, lamps, telephones, and frames in silhouettte....it is so.stinkin.cute. I added the welcome on top of the settee for a little flair. Wouldn't that be cute hanging near the front or back door, or in a guest bedroom?


What could be cuter than a monogrammed birdcage? Love, love, love this!


Or an adorable monogrammed sign for your porch?


I have to apologize for being so absent the last week. Sometimes life just gets the better of you and you have to know when to step back. My sweet husband got home Thursday evening for a two week leave, my dad had 4 stints put in his heart the next day, and on Saturday we attended a funeral for a sweet friend at church who lost her husband in Iraq. They are expecting their first baby next month and he was supposed to be coming home in time for the birth. I have never attended a funeral for a fallen soldier before. Needless to say, it was overwhelming and so unbelievably sad. But as a military family, we were so very honored and proud to be there to honor this young man who gave his life to serve our great country. I will never forget that day, and I will never forget this young soldier and his sacrifice for all of us. It made me remember how blessed we truly are and how proud I am to be an American!


Wednesday, April 14, 2010

Cricut Tips and Tricks


I have had so many questions, comments, and e-mails lately about the cricut....I thought a nice little post was in order! So many people are afraid of their machine and don't know where to start. Others are considering buying one, but worry about the added cost of supplies. Guess what? I felt exactly the same way when I first got mine. It totally intimidated me. So today I'm gonna hold your hand and walk you through the scary parts. And I'll share with you some helpful tips I've learned along the way. So.....let's get started!


First of all, don't be afraid of it...embrace it. The possibilities are endless and they're just waiting for you to figure them out. Literally, every single time I sit down to use my cricut I find out something I didn't know before. There is a wealth of knowledge to be gained through trial and error. Another thing that bothers people about the cricut is all the added costs. This is where they really get you...watch out! The cricut can easily nickle and dime you to death.....don't let it. I'm here to tell you that there are creative ways to get around buying all those expensive cartridges and constantly replacing those sticky mats.


Frugal tip #1...the best advice I can give you is to buy the Sure Cuts A Lot (SCAL) software. For an initial investment of about $75, you will be afforded the luxury of never having to buy another cartridge again. Each cricut cartridge will run you anywhere from $40 - $90. SCAL will allow you to hook your cricut up to your computer and use any true type font, dingbat, or wingding you already have. There are tons of websites out there that offer free downloadable fonts (google it). Another thing I love about it is that you can design your own stuff right there on the computer monitor. It shows the mat with the dimensions and everything. What you see on your computer screen is exactly what gets cut. You can move your image anywhere on the mat, resize it, weld it to another image, just about anything.....pure awesomeness. Ladies, let me tell you.....this software is invaluable and will save you hundreds of dollars! I seriously cannot say enough about it. I LOVE it. It is easy and very straight forward. And if I can do it....anybody can.


Ok, let's talk vinyl. I know y'all loooooove the vinyl. It is actually my absolute favorite thing to do with my cricut. I was so intimidated at first, like many of you. I started out watching some YouTube videos on cutting vinyl, and I was good to go. Easy peasy, lemon squeezy. Again, don't be afraid of it....embrace it. You'll never learn if you never try, right? Frugal tip #2 is to buy your vinyl somewhere other than the craft store. They only have a few colors, you barely get any, and it's $10 a roll. I buy all of my vinyl at our local sign shop. They sell it by the yard (24" x 36") for about $6. I think that's a great deal, especially since I can pretty much get any color I want. They have tons and tons of colors to choose from and to top it off, it's excellent quality. I had one reader tell me that her local shop actually gives her their scraps of vinyl. Most of us are likely not that lucky, but it never hurts to ask, right? I have established a friendly relationship with the staff at my local place. They joke when they see me coming that it's "the cricut lady" again, and that I'm going to put them out of business. Actually most of their customers who buy vinyl by the yard are cricut owners....word is spreading fast!


This is just a sample of some of the things I've cut out in vinyl with my cricut and the SCAL software. The birdcage font I paid 99 cents for....LOVE. I'm working on a cute canvas door hanger for my sister that I'll show you in a day or two.


Cutting Vinyl 101

I usually cut a piece of vinyl off the roll, close to the size I want my image to be. I hate waste. I set my pressure to medium, my blade depth to 5, and my speed on max. You want the blade to cut through the vinyl, but not the paper backing. After your image is cut, you'll need to peel away the excess vinyl. This includes the outside edges, the middle, even those tiny bits and pieces in between each cut....see above. When you're all done picking it apart...you'll have a beautiful vinyl image ready to play with.


Next you will need to use a transfer paper or tape to lift the image off the paper backing. Frugal tip #3.....use contact paper. I cut off a piece the size I need and I reuse it over and over and over again. I bought a $3 roll of the stuff about 6 months ago and I am just now running out. The roll they sell at the craft store is even smaller than the roll of vinyl they sell, and it's also about $10.


Once you have your transfer paper cut, peel it off the paper backing and lay it on top of the image...sticky side down. Now run your fingernail, a scoring tool, a credit card,or a pampered chef scraper (perfect for this) over the image with some pressure. As you peel the transfer paper away, the image should peel right up with it. If some of the vinyl is not pulling up, simply lay the transfer paper back down and rub harder. That should do it.


Now you're ready for the fun part. You can stick vinyl to pretty much anything....glass, walls, painted wood, unpainted wood, notebooks, canvas, frames, plates...just about anything. Paneling and textured surfaces are tricky, but can be done.


For demonstration purposes I chose to put this image directly onto the glass of a frame. Lay your transfer paper, sticky side down. Be sure and score it like I said before with your fingernail or other tool. You want it to be stuck down pretty good before you start peeling the transfer paper away. As you peel, rock it back and forth, and peel it back onto itself.


My cute little impromptu frame for spring. Now that I'm looking at it, I guess I should have laid the bird down first. He should be behind the bars of the birdcage, not in front. Oh well, live and learn, right?


Frugal tip #4.....repurpose your unsticky cutting mat and make it sticky again. I shared this tip with y'all back in February and got a huge response from that one simple trick. You can read about how to do that here. It is so simple and it works like an absolute dream. It will seriously make your old worn out mats as good as new!


I hope this post proves to be helpful to y'all. I love to share the things I learn along the way with my lovely readers and friends. I don't mind being the guinea pig...I'm ok with that! And if you think of something I didn't cover or have more questions, I will answer them in the comments.


Monday, April 12, 2010

Jewelry Giveaway from Kristen's Custom Creations!!!

I am so excited to share this beautiful line of handstamped custom jewelry with you all today! When Kristen's Custom Creations contacted me about doing a giveaway, I was thrilled. Who doesn't love jewelry, right? Mother's Day is coming up next month and a custom made piece of jewelry would make any mom proud! Kristen has some absolutely adorable pieces in her shop. Here are just a few of my favorites........


The Double Stacked A Lot of Love necklace will go to one lucky winner. I am quite partial to this one, especially since I'm wearing it around my neck!


Love, love, love this look...tres chic!


I really need this reminder with me at all times, my constant companion cheering me on.


This book is a family favorite at our house. My little girls say this to me every single night. Precious.


So sweet. And it happens to be a great song as well.


I absolutely LOVE the pieces she offers for dads. This would make the perfect gift for Father's Day. Sweet and sentimental without being girly and frou frou......perfect.


This one is just plain fun. I love it as a keychain or a necklace. And it's pretty gender neutral, to make gift giving simple.


This is my gorgeous necklace that I proudly wear every single day. I love having my babies close to my heart for all to see.


To enter to win a custom piece of your very own from Kristen's shop, do one or more of the following.......


1. Visit Kristen's shop, come back here and tell us your favorite item

2. Become a fan of Kristen's facebook page

3. Blog, tweet, or facebook about the giveaway


Please be sure and leave a seperate comment for each thing that you do, so I can make sure you receive additional entries!


Kristen is also offering free shipping during the week of the giveaway to my readers. Be sure and mention my blog at checkout. This giveaway will run through next Tuesday April 20th, ending at 6pm CST, and is open to US residents only.


Pottery Barn Inspired Plate Wall...DONE!


I am loving how this wall turned out. It was quite the process, but I am so glad it's finally done. It was much harder than I had anticipated coming up with an asymmetrical arrangement for my plates. The Nester talked about hanging plates freestyle last week, and of course hers looked amazing and effortless. I spent the last couple weeks playing around with different arrangements and finally stumbled upon one I loved. I wanted it to have that organic, free flowing look. Ummmm...not so easy for a girl who craves symmetry. I had a general idea of where I wanted them to be and how I wanted them to look, but I was getting really frustrated with the process. So I just started hanging them without thinking too much. Apparently, this is the way to go when hanging plates "freestyle". I absolutely LOVE it!


I think my knockoff of this PB version is pretty kick butt!


I found the black and white damask and zebra plates at TJ Maxx, 4 to a box for $6.99. I think that was the turning point of this project. These amazing plates were exactly what I didn't even know I was looking for. The zebra ties in with my zebra rug and the damask compliments my drapery panels. I had a few leftover, so I hung them above the bathroom light fixture.
Perfection!


I am soooooo close to finishing this room I can taste it. I still need a bathroom mirror and to finish my desk area and shelving, but I can actually see an end in sight. Thank goodness! Have you ever started a project or room redo thinking it would be easy and it turns out to be the never ending story??? Apparently, I have a problem with biting off more than I can chew. Will I ever learn?


Sunday, April 11, 2010

Online Shopping Disaster...Happy Ending

Remember the other day when I was ranting and raving about the hideousness of my new light fixture from Overstock? Well, guess who got an e-mail from Overstock's Customer Relations Department.....that would me be and my mortified self, thank you very much! At first I was embarrassed about what I had said, then I was flabbergasted that they had found my piddly little blog, and then my failing faith in customer service was restored! Not only did they apologize for the misrepresentation of the item, they actually enjoyed reading about my experience, and complimented my blog! Ummmm...hello? And on top of that they compensated me with a free year membership to Club O. I am astounded with the customer service I received and I will recommend Overstock to everyone I know. They are obviously a wonderful company who really care about customer satisfaction. That does not happen everyday. Unfortunately, good customer service seems to have become a privilege rather than a right in most cases....but not with Overstock. They have exceeded my expectations and I will continue to be a faithful shopper with them! And for your reading pleasure, here is our conversation, ENJOY ........


Overstock.......

Dear Amanda,

I am writing to you on behalf of the Executive Offices of Overstock.com concerning the blog about the sconce you recently purchased. I enjoyed reading about your experience.

I am delighted to hear that you will continue to shop with us, even though the sconces gave you the “heebies.” As a token of our appreciation, I have added a free one-year membership in our Club O. Club O entitles you to 5% off everything you buy and free shipping on each order.

Please let me know if there is anything I can ever assist you with and I’ll be happy to help. Thank you again for your enjoyable blog and continued patronage.


Sincerely,
Executive Customer Relations
Overstock.com


Me.......

Thank you so much for theClub O membership...that is awesome. I really do LOVE shopping with overstock. However, I am mortified that you read my post on the light fixture. It was the truth, but I am a bit embarrased now! Whew...I'm so relieved I added that last paragraph stating how much I loved the "O", regardless of this one experience. Thanks for understanding and for your generosity.


ME Again......

Dear Landis,

The more I think about this, I have one question...is this a joke???

:)
Amanda


Overstock.....

Dear Amanda,

This is definitely not a joke. Please don’t be embarrassed. It’s us that should be embarrassed that you got something other than what we stated on the website.

I subscribe to Google Alerts for Overstock.com and your blog came up. I appreciate your honesty. The Club O is my way of making things up to you and to show you we appreciate your business.

Please feel free to contact me for anything.


Sincerely,
Landis
Overstock.com