Tuesday, December 29, 2009

DIY Monogrammed Cupcake Tower


I think this simple stack of cast off Christmas boxes, turned cupcake tower is the most wonderful thing ever! I made it for my niece's wedding shower tonight. It was really so simple...anyone could recreate this. I literally went out to the garage and chose some leftover boxes from Christmas morning (that will thankfully be picked up with the trash tomorrow), and wrapped them in brown craft paper. My original plan was to find some gorgeous wrapping paper in her wedding colors, but that didn't happen. Thank goodness for gorgeous ribbon to spruce it all up. I used what I had in my stash of ribbon scraps and bought one roll at Target in the Christmas markdowns. I used my Cricut to cut out the circles and the letters for the monogram. I used each of their first initials (H & D) and the initial of their soon to be last name in the middle.


Then we just surrounded the boxes with the cupcakes and, voila...a super cute, ultra fab, monogrammed cupcake tower is born!


The ribbon and the paper monograms are attached using double stick tape. Oh, how I love thee, double stick tape! Have I ever professed my love for this amazing stuff? I LOVE it and use it all the time for so many things....it makes me very happy.


Here...let me zoom out so that you can get a better view, because obviously, I haven't shown enough pictures of it yet.


See those chocolate brown mercury glass trees? My amazing mother found those at a discount/closeout/salvage store today. They were two for a dollar! That's 50 cents people...2 quarters, or 5 dimes, or 20 nickles...seriously! The price tag on the bottom said $24.99. She has some serious skills.


Se how much fun we had putting this together? Hahaha...I just wanted to use this picture for the scale to show you how large this thing was. It made an amazing centerpiece, even though it wasn't exactly in the center of the table. We actually had to move it because it was bumping into the bottom of the chandelier. I like it even more angled off to the side.


I am already thinking about making another one...it really was that fun! My daughter's 4th birthday is in two weeks and I think another cupcake tower is in order. Hers will be ultra girly, with lots of pink and polka dots. I hope the vision of it I have in my head lives up to my expectations...I wouldn't want to let myself down!



giveawaysLife as Lori


HookingupwithHoHShow and Tell Green

The Girl CreativeThe DIY Show OffMakingSumo's Sweet Stuff CreativeShareWednesdays http://www.thethriftyhome.com
All Thingz Related mmm button

Tuesday, December 15, 2009

A Winner and a Papercraft

Thanks to all who entered the giveaway from The Lavender Road! I apologize that I am a day late announcing the winner. I know y'all know how it is...life just gets the better of you sometimes, and you have to roll with the punches. So with no further ado, the lucky winner is.............comment #48 Heather L. Congrats Heather...I am so excited for you and I know these precious little sachets are going to be put to good use by a special lady! Heather's comment was so sweet and really touched my heart. I hope she doesn't mind if I share it with you. This is what she said ....


"I love these! I think I'd have to give them to my mom - without her, I don't know what I'd do. I have five kids (the oldest is my stepson who is 18, the youngest is my baby boy who is 9 months, so yeah, it's pretty chaotic around here!) and she helps me with them SO much! I'd love to win and make her Christmas a little more special =)"

How sweet is that??? The true spirit of Christmas...giving.


In the midst of my insanely crazy week, I decided I needed a papercraft fix. It's been a while since I created something just for fun, for no other reason than I wanted to. I saw these neat paper flower ornaments months ago on a blog, which I cannot remember...sorry. I've had them in my idea file just waiting for me. They remind me of the ornaments my mom used to make for our tree growing up. Back in the day when our tree was decked out in styrofoam balls cut in half with each of the 5 kids pictures glued on the front. The backs were adorned with beads and sequins, and they were strung with yarn. They were handcrafted with a mother's love. At the time, I'm sure we thought they were terrible and embarrassing. Nowadays those are the very ornaments we seek out in earnest each year! The handmade, handcrafted keepsakes mean the very most. And they carry with them the best memories, too. So pardon me while I get all nostalgic and weepy over some silly paper ornaments. I needed a little feel good today!


Start with an 81/2 x 11 sheet of paper or cardstock. Cut it into 11 one inch strips. Stack the strips, staple in the middle, and fold like a book.


Use double stick tape on each end of the strip and tuck into the center. You can use invisible thread to hang them or pretty ribbon. They could be hung on the tree, from a chandelier, or in varying lengths in a doorway. You could also scatter them in the center of a table for a cute centerpiece.


Happy crafting and memory making!


Friday, December 11, 2009

Come on over for a Fabulous Giveaway!


I want to introduce ya'll to my good friend Kim. She just opened a brand new etsy store called The Lavender Road. She sells the most beautiful little lavender sachet pillows in a wide array of gorgeous fabrics. This is her second store on Etsy. You may know her from her other store, Flashy Fish, where she sells the most adorable hair accessories. Let's help her out and give her new store a holiday boost. She is offering a set of lovely sachets from her current inventory as a giveaway for my readers! And free shipping on all orders if you mention this post when you check out. Thanks Kim...what a generous offer!


This set was featured on Etsy's front page this week, so you know it must be awesome!


Look at all of the beautiful colors in her fabric choices. So vibrant and cheerful!


What a great gift this hanging sachet would make. I just adore this one..."Love never fails"... such a sweet reminder!


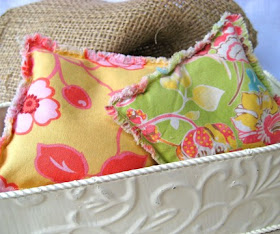
My absolute favorites are these two with the soft frayed edges. Yumm!


Isn't this christmas one with the bird absolutely adorable? Who wouldn't want a few of these hanging around their house? Kim describes these best herself...here is a snippet of what she has to say.....


This beautiful and lovely smelling sachet would make a wonderful gift for yourself or a friend.The sweet little Christmas bird is topped off with holly and a velvet ribbon hanger. They look beautiful hanging from lamps, door knobs, cabinets...anywhere! Each lavender sachet is made from 100% linen, hand stamped, and filled with lavender and a touch of flax seed. The flax seed makes them feel great...nice and squishy! Each one measures 5 inches.

A few more benefits of these Pretty Little Pillows:
** They make a great hostess gift to keep on hand
** Linens smell fabulous when used in a linen closet
** Freshen your car
** Eco-friendly
** Display near your bed to aid in sleep
** The scent lasts and lasts, just give a squeeze
** Natural moth repellent
** Freshen your closet and clothes
** Smelly boy's rooms...ha! I have two of them!


To enter to win a set of these lovely sachet pillows, leave a comment telling us what you would do with them and if you'd keep them or give them as a gift. And don't forget, Kim is offering free priority mail shipping on orders from The Lavender Road when you mention this post! I will leave the giveaway open until Sunday evening at 10pm. Good luck!

Thursday, December 10, 2009

My Wrapping Paper Addiction


Do you need a few more decorations for Christmas, but don't want to spend any more money? Yeah, me too. I basically need more Christmas decor like I need a hole in the head...but whatever! I have a great solution for you and it's free. What's better than free, right? My good friend Kimm @ Reinvented posted something similar this week with wrapping paper. She used a beautiful red and white damask pattern...very elegant. We obviously have a lot in common...we post similar ideas and we both want to bathe in Hobby Lobby wrapping paper. And cover every thing that doesn't move in it as well! Remember those neutral candles I transformed by simply covering them in wrapping paper? One of my most favorite tricks for decorating on the cheap...and stinkin cute too!


I had this big space on top of my giant armoire that was completely empty and needed to be filled. I took an old ugly hat box destined for the garage sale pile and some empty shipping boxes and just wrapped them up with my most favorite wrapping paper of all time. I wish I would have gotten several rolls of this stuff at Hobby Lobby when I had the chance. Our store has been sold out of almost all things Christmasy for a couple weeks now.


I love the way this little vignette turned out. What I love even more is that it was FREE! I cannot believe I actually considered buying some cute boxes (almost identical to mine) at Hobby Lobby just for display. I'm glad I listened to that cheap voice in my head that told me NO.


I couldn't sleep last night (nothing new), so I decided to go out in the freezing cold at 11:30 and decorate my front door. I know my neighbors must think I'm a freak of nature. Especially when I start snapping pics of my house in the wee hours of the morning!


I really love the way it turned out, but I'm starting to think it looks like Christmas threw up all over my house! Am I going overboard? Am I taking the whimsy too far? Should I scale it back a bit? The rest of the year, I am pretty conservative in my decorating, but the holidays are the perfect time to let loose and fun with it. And believe you me...I am having fun with it. But I might need to start having a little less fun!

Tuesday, December 8, 2009

Gussying up the Mantle with Garland


Ha! Just when you thought my mantle couldn't get any more fou-fou...I add more fluff! Last year, I fell in love with this meshy stuff and used it everywhere I could possibly drape it. It adds the perfect touch of whimsy to almost anything. Especially a plain jane, tired old garland. And it's very easy to work with...you cannot mess it up, I promise. Just pouf and fluff and mold it to the shape you want...and voila, it's fabulous!


I love it all glittered up and sparkling at night...so pretty.


I also added some metal candy canes I got on our anniversary trip to Fairhope, Alabama last year...


And a cute little lime green metal present in the middle! And ribbon...of course...you can't have too much ribbon.


My tree may not be decorated yet, but it does have a fabulously fluffy bow on top. I can never get a star to stay on my tree, so this year I used my mesh to create a simple topper. That is, if you can call a ginormous fou fou meshy bow...simple? Whatever it is, I LOVE it!


And because, my night time photos leave ALOT to be desired, here is a shot with the lights on.


Friday, December 4, 2009

Let it Snow, Baby!!!


It is SNOWING in south Mississippi!!!! Can you tell we rarely get snow? This is a huge deal for us southerners. For many of you, my excitement over a little snow will be laughable, and I'm ok with that. I feel like a little kid on Christmas morning. I had to go out in it and play and take a few pics to share!


It is actually coming down pretty hard and thick and it's sticking. It's the good stuff too... real puffy and fluffy and soft!! I don't think I can ever remember it snowing this good. I can't till the morning when my little girls can see it. They will be so excited! Keep your fingers crossed for me that it will stick through the night!


And just because...this is my neighbors side yard. This picture does not do their Christmas lights justice. You would not believe how elaborate this set up is. They start the day after Halloween putting it all up and finish by Thanksgiving. It is unbelievable and so tacky...and we LOVE it! My girls beg to go out every night and look at the lights before bed. It's so cute! I will work on getting a better picture so you can REALLY see the full effect. They were actually standing in their front yard when I took this and seemed rather peeved at me. Oh well, they'll get over it. And hello people...if you're gonna pretend to be the Griswolds and put up 46,000 lights in your yard...people are probably gonna stop and gawk and take pictures! Can I get a witness???


Tuesday, December 1, 2009

Decking the Halls...and the Mantle

I am having so much fun pulling out all the Christmas bins and finding new ways to decorate with my great old stuff! Those little white felt trees are still one of my absolute favorite purchases of all time. And the best part...they're from the Dollar Tree! Stinkin cute and only one dollar each. You gotta love that!


This is my mantle in progress. I still have to put up my fou fou garland to top it all off, and then it will look complete. I usually don't go for this much glitz, but Christmas is the perfect time to glam it up a bit. And I take full advantage of that to have some fun with my holiday decorating. The rest of the year, it's pretty simple. Don't you just love my adorable little (not so much) Elfie? I scored him for 50% off the day after Christmas last year at my favorite boutique. This is a store I only window shop at, so it was so fun to actually buy some cute stuff there!


I totally copied The Nester on these feather trees she posted about. I fell in love with them on her blog and they were only 9.99 at Dayspring. The red jewel ornaments I found at Target. At last count I had 7 feather trees. I can't stop making them....I've got a thing for feathers this year! It is turning out to be a slight addiction.


And last, but certainly not least.....my candles wrapped in red houndstooth wrapping paper from Hobby Lobby. This is one of my absolute favorite, no fail ways to spruce up plain candles for any holiday. I'm sure many of you have seen me post this little tip many times before. But, I just had to share it again for those of you who might be new here. It is one of the cheapest and easist ways to add some oomph to your decor. I use wrapping paper, scrapbook paper, ribbon, fabric strips, and more to decorate the simple off white candles I keep up all year long. And each time I change them, it looks and feels like I went out and bought new candles. A little retail therapy without leaving the house and it's FREE! It's great to be able to make do with what you already own and repurpose it to feel new again. What have you repurposed this season? Tell me your favorite thrifty holiday decorating tip.